

This is going to be the easiest step-by-step tutorial on how to set up Cloudflare for WordPress, for absolute beginners in WordPress site development. Chances are you have already begun the process of setting up Cloudflare on your site but couldn’t get through some aspects. That’s absolutely fine.
You may be considering to scroll down a bit to pick up from where you got stuck, with the conviction that a simple glance could close the Pandora’s Box. Well, I would recommend that you read through the entire content and steps, perhaps you have missed a vital step for the setup. However, if you haven’t done a thing on the Cloudflare set up process, we’re on the same page, and we’ll go through the entire steps together.
Before we dive into the steps, let’s first understand what Cloudflare is and the benefits of setting up Cloudflare on your WordPress site. For anyone still trying to understand what it entails to have CDN on a website, this article will provide you with the answers before the steps to set up Cloudflare for WordPress.
What is Cloudflare?
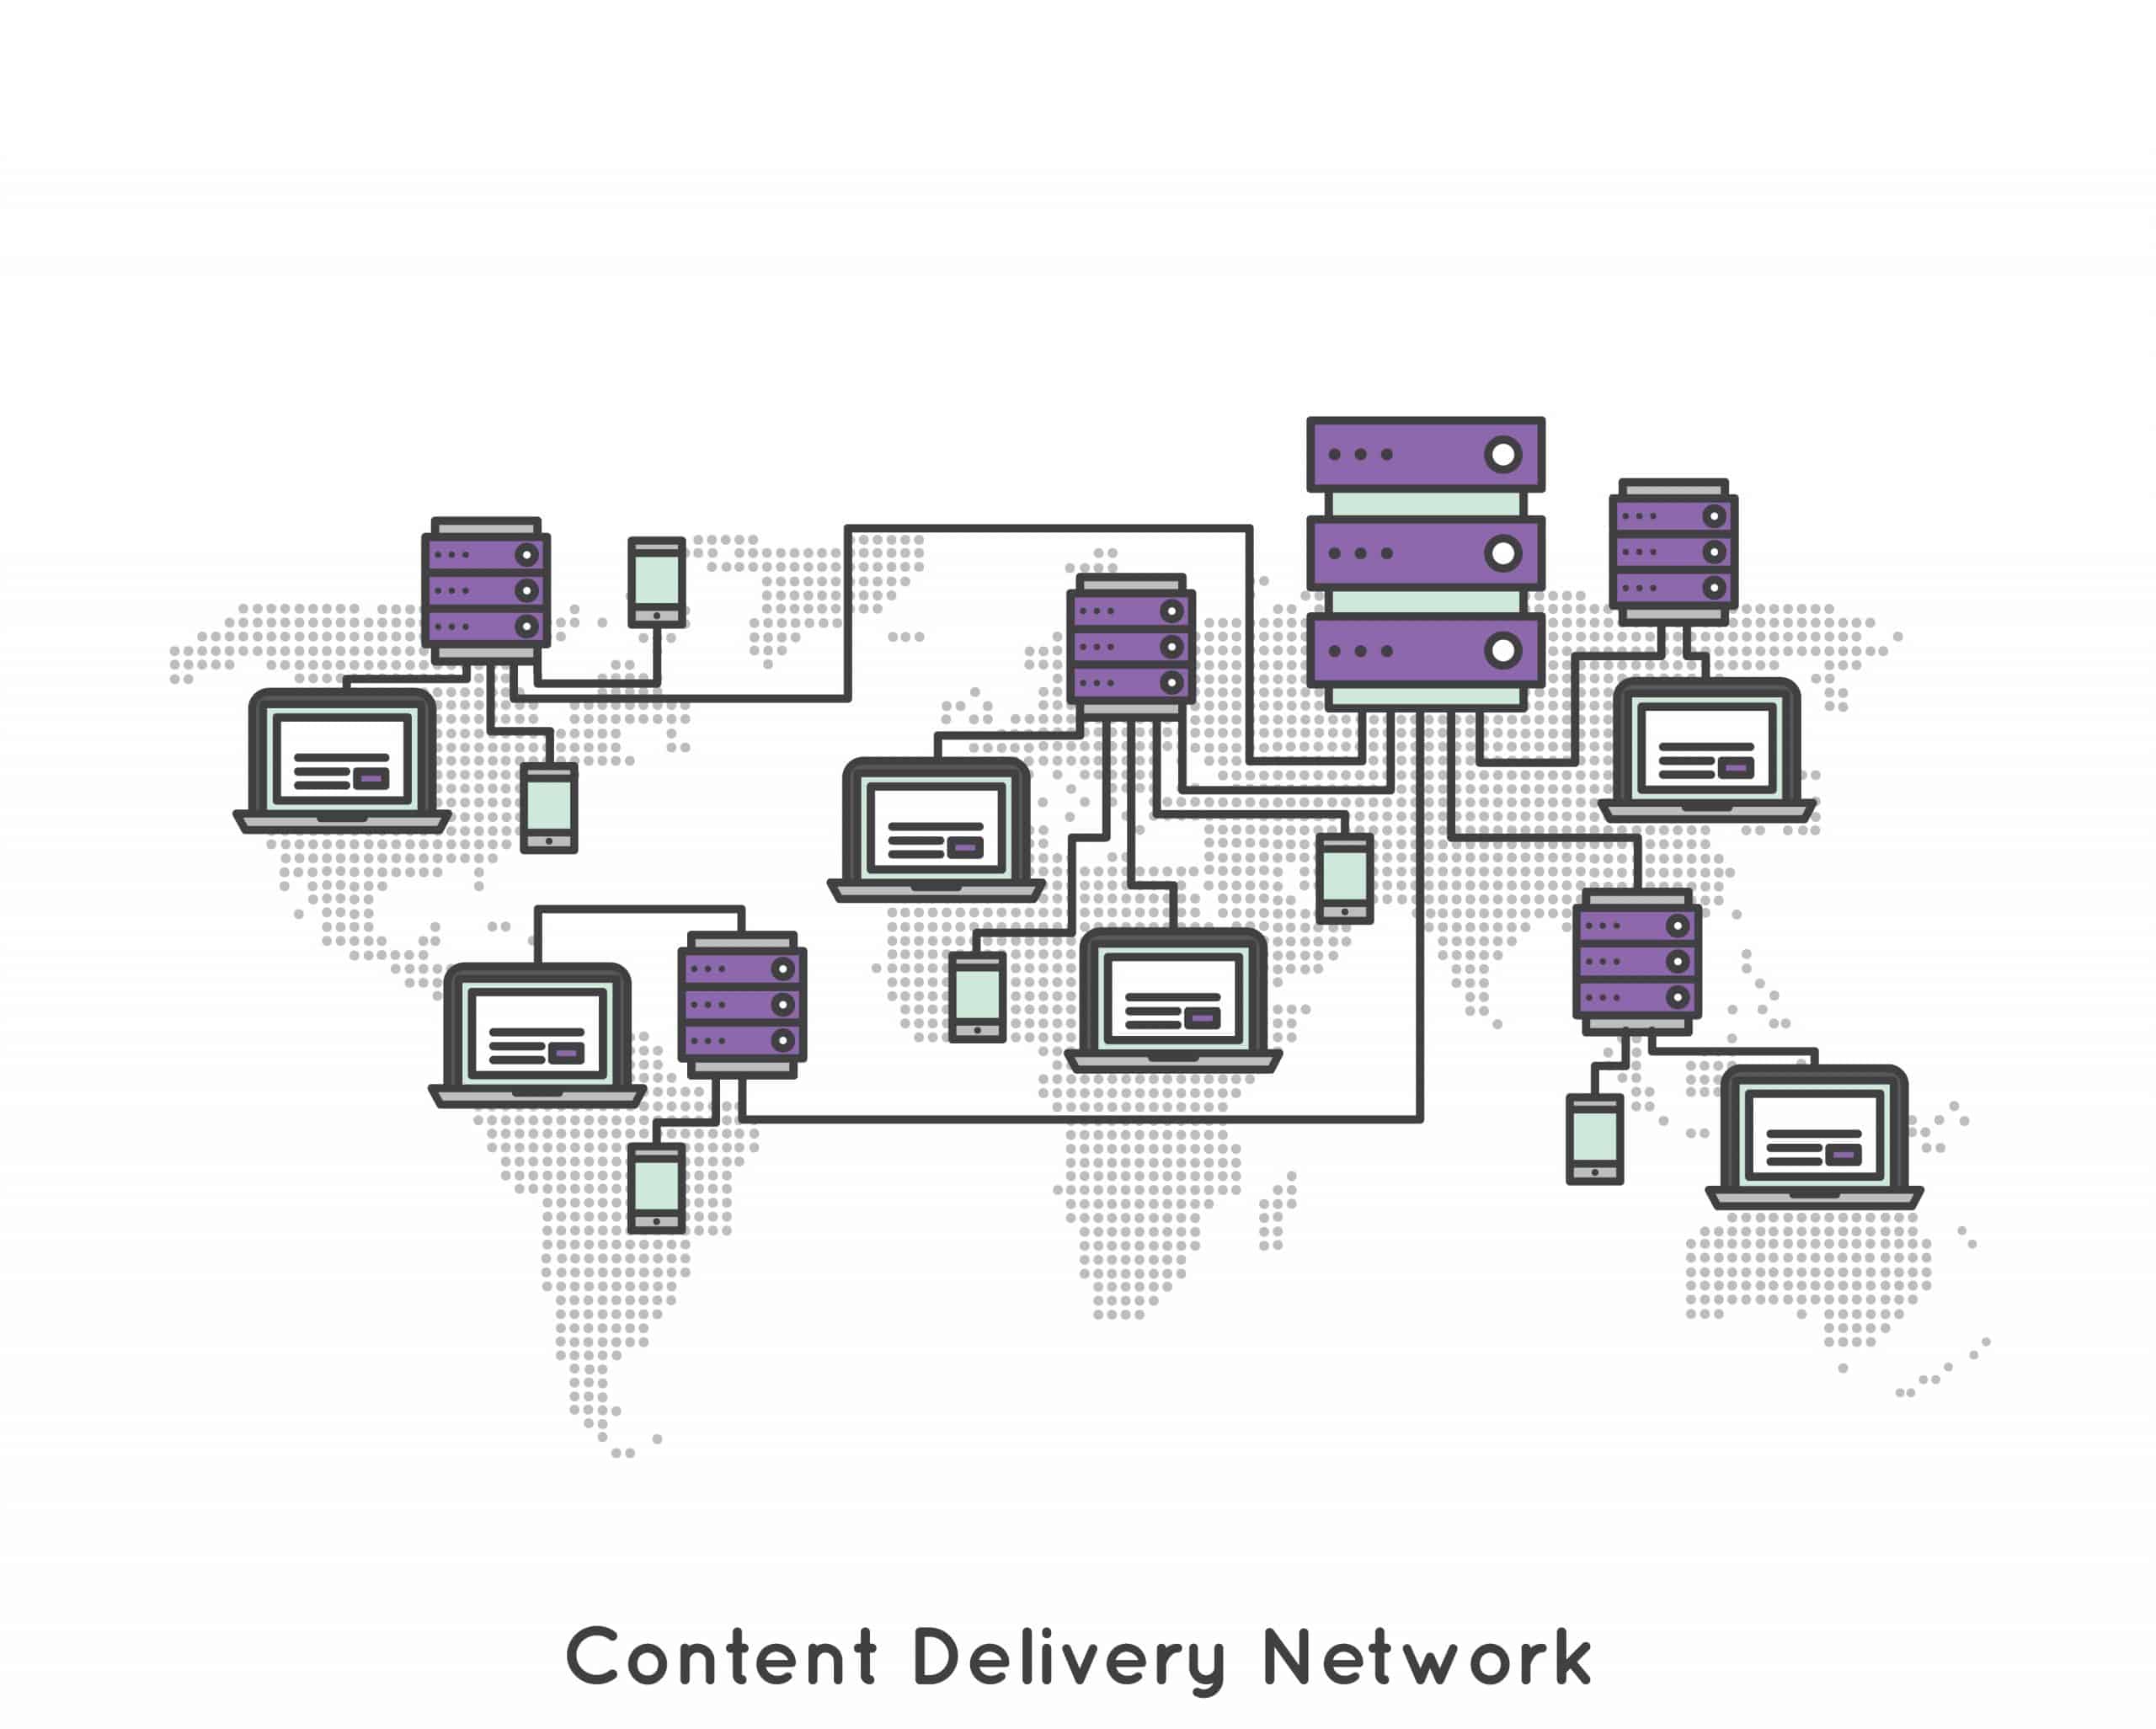
Cloudflare is a Content Delivery Network (CDN) that improves a website’s load speeds and security by acting as a proxy between the website and its visitors. The service, which only requires a change to DNS, stores your website static resources across its numerous data centers and delivers the cached static content to your site visitors from the nearest servers. In a nutshell, Cloudflare dynamically optimizes your website content across the internet.

Benefits of setting up Cloudflare for WordPress
Aside from having one of the world’s biggest server networks for CDN, Cloudflare services include many other useful features that not only improve site SEO but ensure sustainable and quality user experience. Here are a few benefits of using Cloudflare for WordPress.
- Free SSL: It’s true that most hosting companies now include SSL as a compulsory service, but many websites still don’t have an SSL certificate. Setting up Cloudflare would be a genuine and free means of getting HTTPS on your site if your current hosting plan doesn’t include SSL.
- CDN: The content delivery network service makes the static content of your site to load faster and saves bandwidth by delivering the content from the closest server to visitors.
- DNS security: Cloudflare services include DNSSEC that protects information on your website DNS and data integrity.
- DDoS Mitigation: This is a set of tools that protect your website from the impact of distributed denial-of-service (DDoS) attacks.
- Image optimization: the Polish service has an automatic image optimization feature that helps to deliver them more quickly to browsers.
- Cloud WAF: Cloudflare Web Application Firewall protects your site from over 145 types of web applications attack.
- HTTP/2 Protocol: With a connection twice faster than HTTP/1.1, the h2 protocol used by Cloudflare helps to load multiple page elements over a single TCP connection.
- Auto minify and Brotli compression: these two features allow you to compress the file size of your website’s source code (JavaScript, CSS, and HTML) and texts for faster delivery.
What does it mean to set up Cloudflare?
It’s important to understand the major change in your website operation as you set up Cloudflare to improve the user experience. As mentioned earlier, CDN activation requires a DNS change, pointing your website visitors to the Cloudflare server, which then points to your hosting server. You are simply placing Cloudflare in between your host and the clients. In other words, any research on your website server would return Cloudflare, not your hosting company.
You won’t find any of this confusing if you have ever migrated a website from one host to another. Setting up Cloudflare means, each time users make any request to your website, the Domain Name System (DNS) will fetch Cloudflare IP address from which your site will be served.
In a nutshell, the major procedure is to add your site to Cloudflare and point your website to Cloudflare. One of the steps will require you to change your DNS server (nameserver) to that of Cloudflare, which will begin to receive and manage all your website traffics.
How to set up Cloudflare for WordPress (Step-by-step Tutorial)
You will need access to your WordPress admin dashboard and domain registrar account to update your DNS and configure the official Cloudflare plugin after the following steps. If you have already completed any of the steps correctly, or the entire steps here, head over to the next steps on this tutorial.
Step 1: Create a Cloudflare account
Visit cloudflare.com and click on the signup link at the top-right corner of the website.
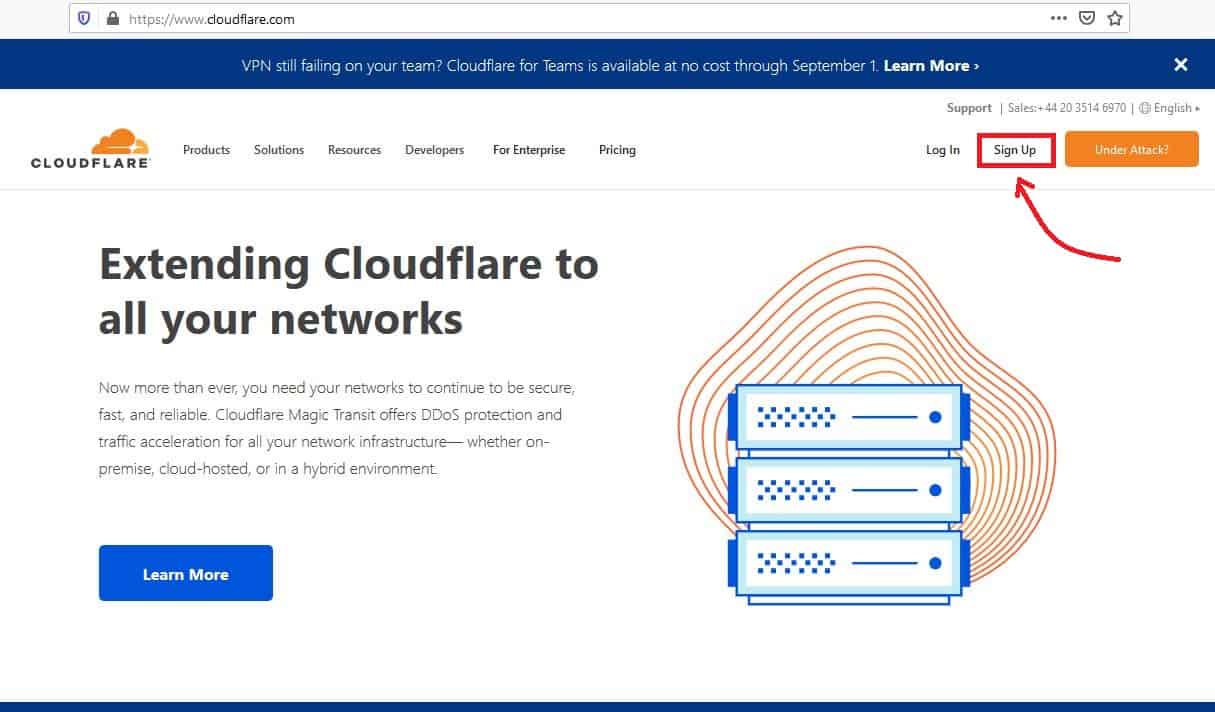

Complete the signup form by supplying your email address and password. Click on the Continue button.
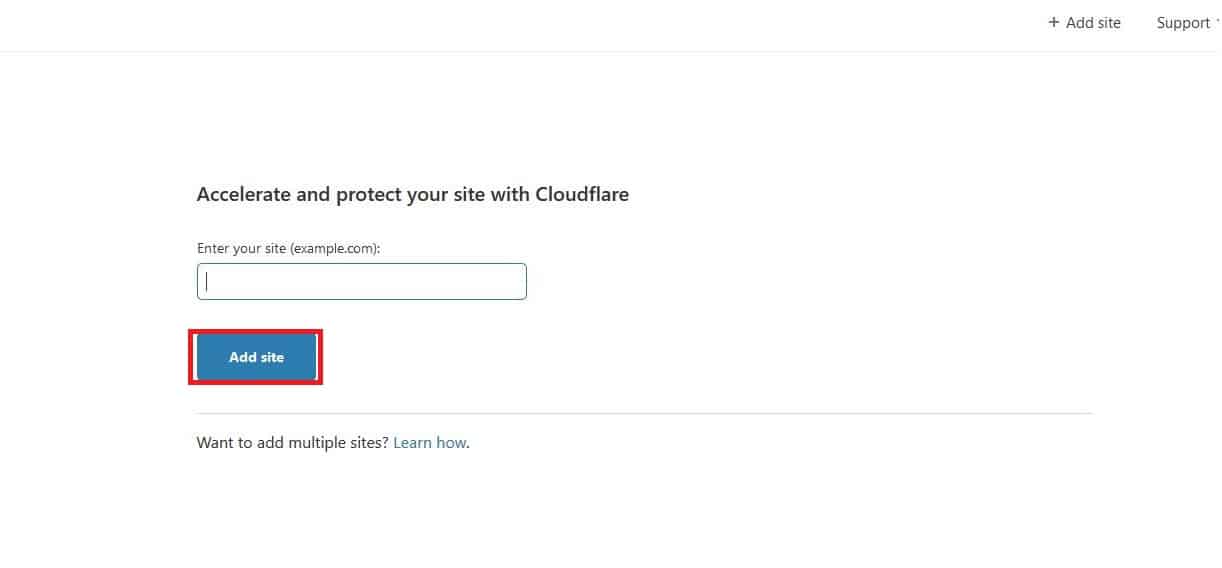
Step 2: Add your site to Cloudflare
Once you submit the Cloudflare signup form, you’ll be taken to your Cloudflare profile with a prompt to add site. Enter the domain name of your WordPress site and click on the Add Site button.

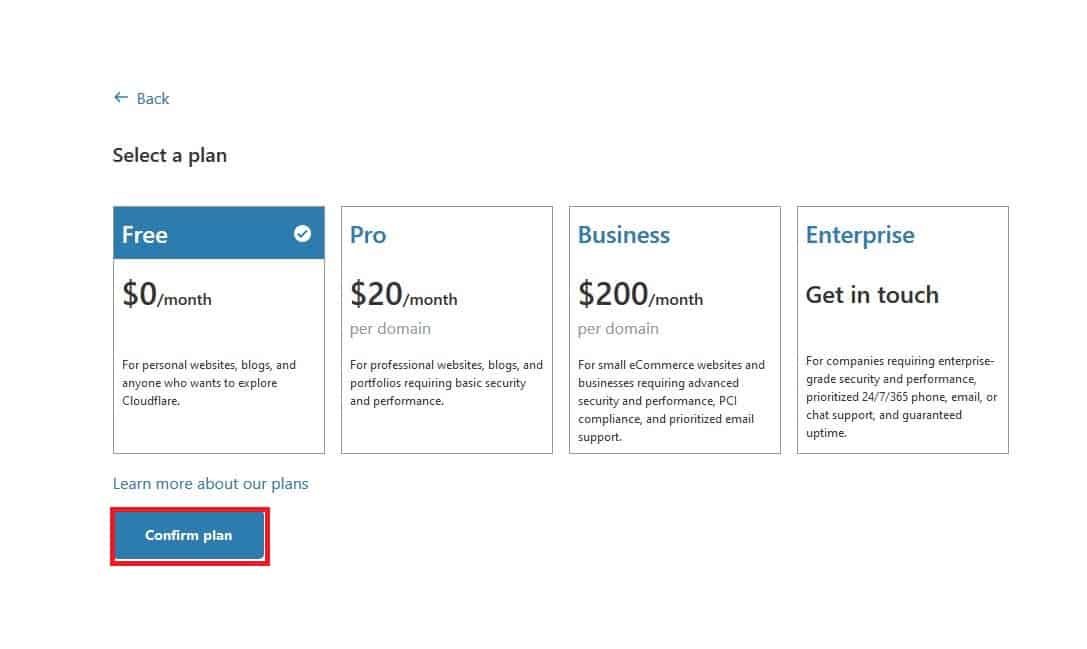
Step 2: Choose a service plan
The next step is to choose a service plan for the site you have just added. Click on the appropriate plan for selection and click on the Confirm plan button to continue with the setup.

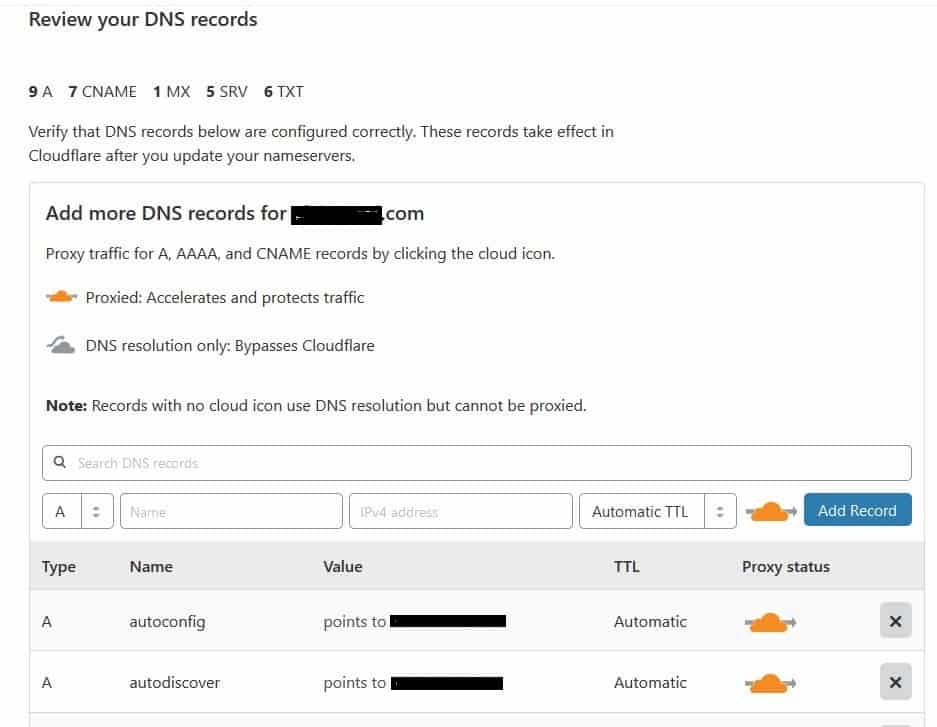
Step 3: Review your DNS records
You basically have nothing to do in this step but to look out for orange clouds next to the different hostnames on your website and the IP address each of them is pointing to. The orange cloud indicates that traffic to the hostname would go through Cloudflare. Scroll down to the bottom of the page and click on the Continue button.

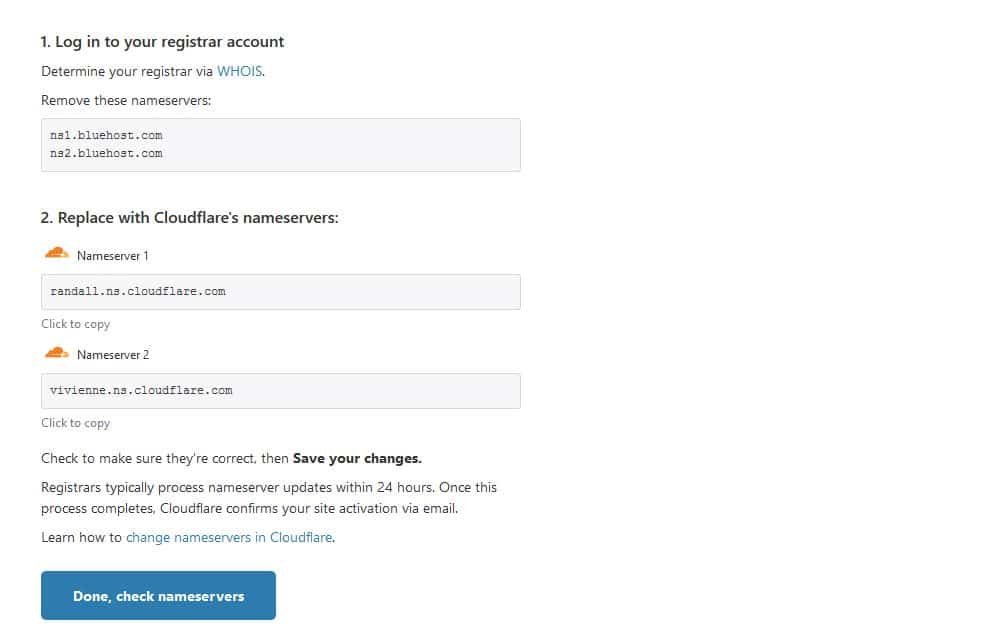
Step 4: Update nameservers or DNS servers
This is where you need to access your domain registrar account. Log in to the account and replace your nameservers with those provided on your Cloudflare set up page. Please refer to your domain registrar’s page for support if you are not familiar with nameserver change. Click on the Done, check the nameservers button down the page as soon as you complete this procedure for the next step.

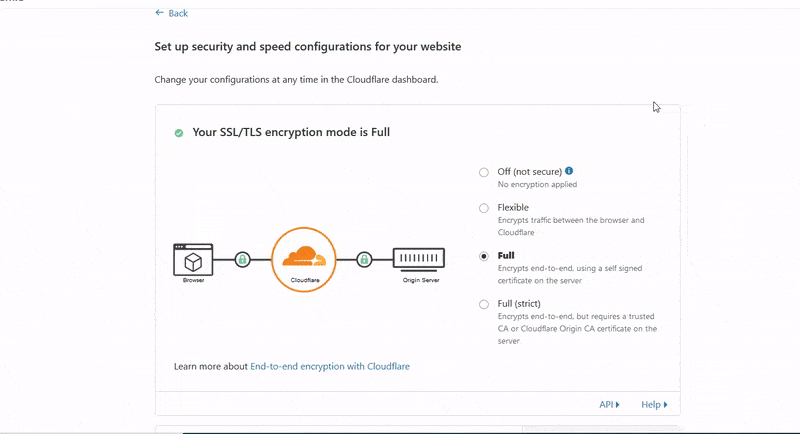
Step 5: Set up security and speed configurations for your website
This page is where you can activate or deactivate SSL, choose different encryption modes for your site protection, and select the source code to minify. You can skip this Cloudflare set up procedure and perform them directly from your WordPress dashboard using the official Cloudflare plugin. Click on the Skip set up a button to skip or the Done button to effect changes you have made on this page.

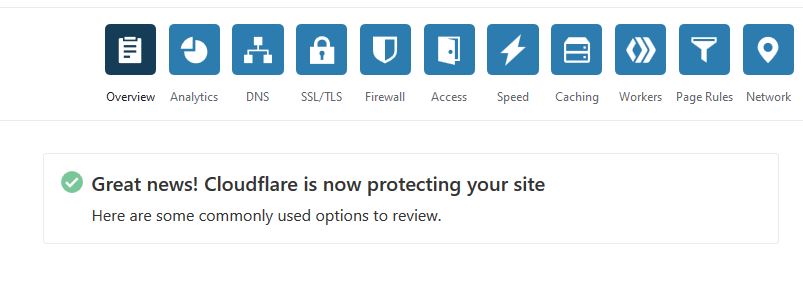
You should now see a goodness message on your Cloudflare setup overview page if the nameservers have been changed successfully. Congratulations! That’s all the steps to set up Cloudflare for WordPress site. You may choose to continue with the next step to have full control of your Cloudflare settings right on your WordPress dashboard.

Step 6: Install and configure Cloudflare for WordPress plugin (optional)
Cloudflare comes with an official plugin that enables users to have full control of their account settings from WordPress. The plugin makes access to your account handy and allows you to quickly clear cached content on Cloudflare each time you update your site, instead of going to the Cloudflare website.
How to configure the official Cloudflare plugin
This plugin doesn’t just allow you to perform setting on your Cloudflare account directly from your WordPress dashboard; it lets you monitor events on your website. You can view web traffic requests by country, bandwidth, and also learn about unique visitors aside from other performance stats. Follow the steps below to install and configure the official Cloudflare plugin on your WordPress site.
- Log in to your WordPress dashboard and click on the Plugins menu > Add New
- Search for Cloudflare using the WordPress plugin repository
- Install and activate Cloudflare by By John Wineman,…(Cloudflare Team)
- From your WordPress dashboard, go to setting > Cloudflare to access the plugin. This should open a login page.
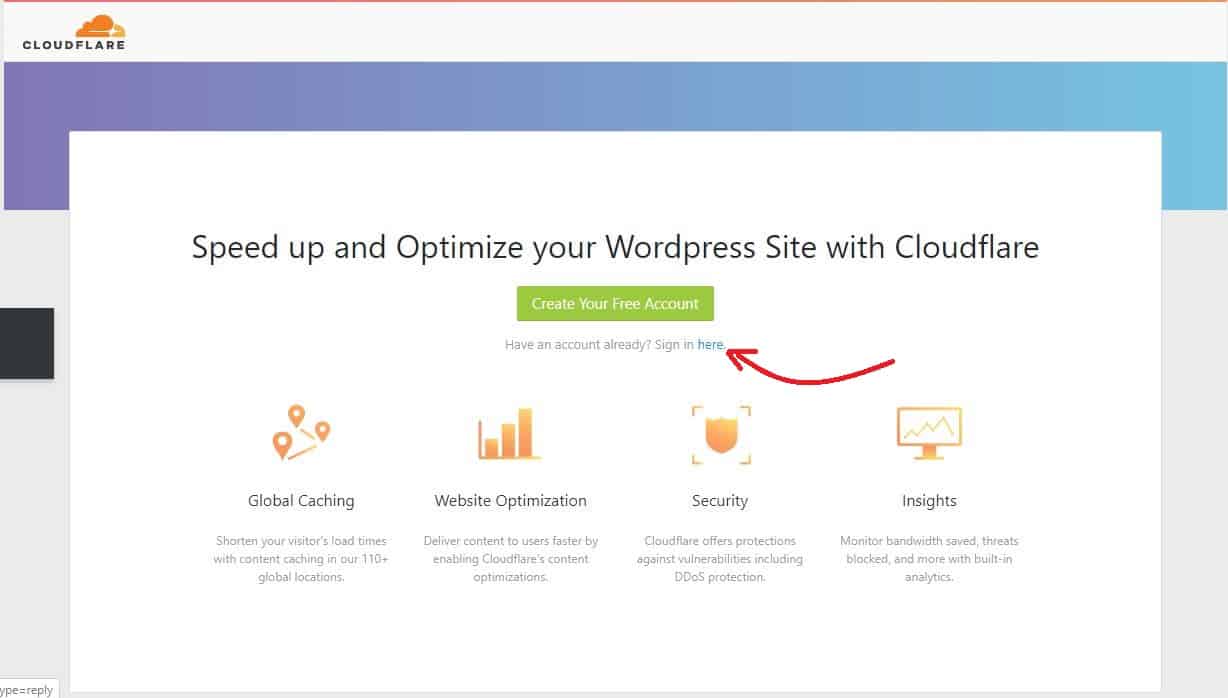
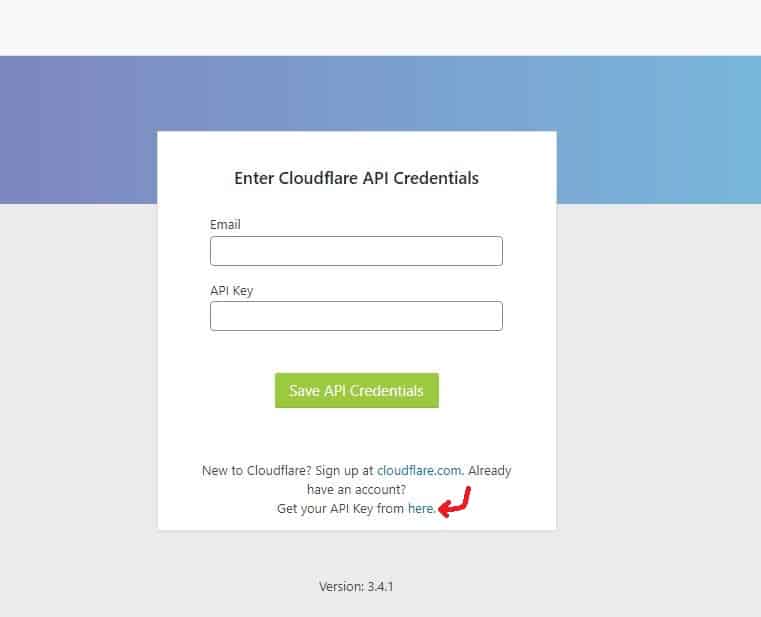
- Click on the sign-in link below the Create Your Free Account button. This should open a sign-in window requesting your email address and your account API key.

- Click on the Get your API Key from here link within the sign-in window. This should open your Cloudflare account in a new browser window.

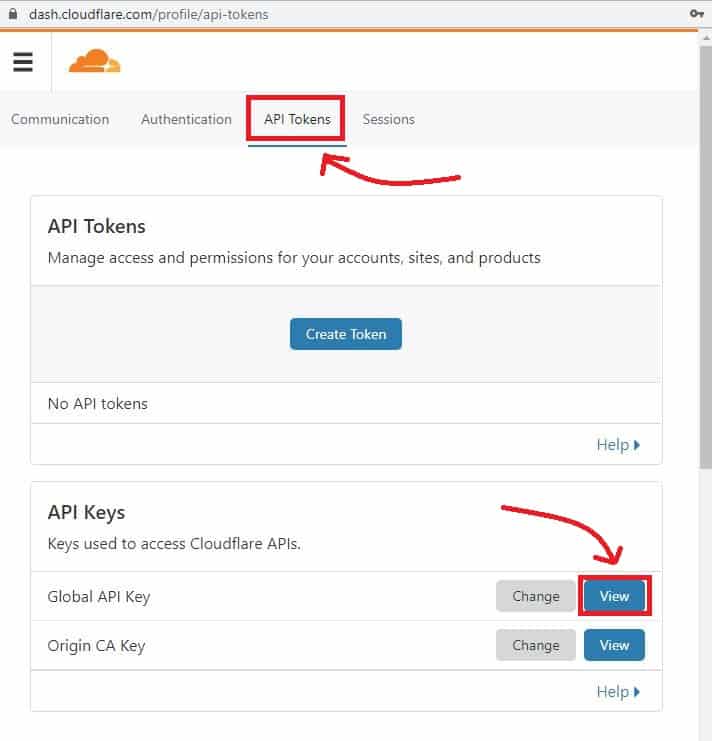
- Click on the API Tokens tab, and under the API keys, click the View button on the Global API Key This will open a new dialog box asking for your password.

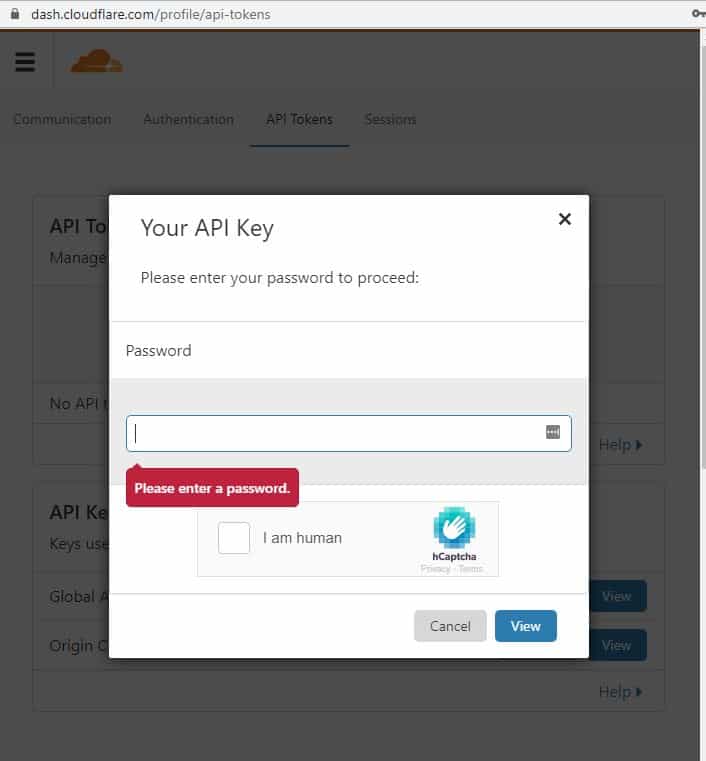
- Enter your Cloudflare account password, tick the captcha, and click on the View

- Copy the API Key to your clipboard and head over to your WordPress dashboard.
- Enter your email address, paste the API key and click the Save API Credentials
Congratulations! You have successfully set up Cloudflare on your WordPress site if you have followed the above-listed steps. That must be very easy. Your Cloudflare dashboard will only include features you have access to, according to your service plan.
Conclusion
The entire Cloudflare set up process should not take more than 5 minutes if you didn’t have any challenge with any of the steps. However, a nameserver change can take up to an hour or 24 hours to propagate, depending on your hosting company. This means your site will not be active on Cloudflare until the change takes effect. In most cases, it takes about 5 – 10 minutes.
The above step-by-step tutorial on how to set up Cloudflare for WordPress is also a major means of improving your site security and speed. You could evaluate the difference in having Cloudflare on your site by performing a speed test from various locations in the world for both scenarios using different website speed test tools. Could you please share your results in the comment box below? Also, let us know if you’re still having any challenges setting up Cloudflare on your WordPress site.