What Is WebP And How To Enable It On Your WordPress Website?
Over half of an average web page is made up of images. Therefore if you can optimize these images, then you can save a lot of space on your server as well as decrease your pages load time.
Ideally, you will want to compress every image that you upload onto your website. This should be done without altering the quality of the images.
If compression does not take place, then the speed of your website will be affected. Then, visitors will become frustrated with how slow your website is, and may ultimately end up leaving your site.
If an image file size is too large, then it will take a long time to download when a visitor clicks onto your page. If it takes a long time to download, then the whole website will be slowed down. Those 2 factors intertwine, so picking good quality photos from sites like Depositphotos, Pixlr, or StockUnlimited is necessary, but irrelevant if you don’t optimize them properly and vice-versa.
Speed is a significant factor when it comes to SEO. Google will take into account how long it takes for your site to load when ranking it in search results.
Which Image Format To Choose?
There are several file types that you can use on the website. GIF, PNG, and JPEG tend to be the most often choice.

In most cases, JPEG is the preferred option because it is of high quality when the picture has a lot of colors. The file sizes are also quite small.
If you have an image that does not contain a lot of colors, such as icon graphics and line drawings, then PNG is your best option.
When it comes to choosing the right type of file, then you may find the following rule helpful. You should use JPEG for images, GIF for animations, and PNG for graphics.
It is vital to choose the right file so that the quality is good and that your site loads quickly. There are pros and cons to using all three main types of image.
JPEG files are ideal for photographs because they contain a lot of detail and are often very colorful. However, if there is a lot of detail, then the file can be quite large, and after compression, they do not always look as good.
PNG files do not work very well for photographs. However, they are an excellent choice for logos because there are no adverse effects when they are compressed. They’re excellent at retaining quality when compressed and support transparency.
If you want to animate your image, then GIF files are the right choice, but they won’t look as good if you choose to make the image static. Jumping through different formats does tend to be tiring since it usually forces you to utilize multiple software to make it happen, but with a powerful plugin like PixTeller, you’ll be able to upload your images and adjust them for different needs, turn them into gifs and apply various effects in only a few simple clicks.
Using WebP Format
Whenever you upload a new image to WordPress, then three different versions will also be created.
These images will all be different sizes – thumbnail, medium, and large. You are still able to access your original image with all the initial sizing. This is quite useful because it means that you don’t have to resize all your images manually.
It also helps you to make sure that all of your pages are optimized with images that are the correct size.
You are still able to edit the dimensions if you need the image to be a different size. If the default settings don’t fit with what you need, you can easily edit the dimensions.
Another alternative is to use the WebP image format. This makes images smaller but still keeps the richness of the image.
They will be of the same quality as JPEG and PNG images, but they are a lot smaller, which means your page will load faster.
According to Google’s data, they are 26% smaller in size than PNGs and 25-34% smaller than JPEGs — while keeping the same quality.
Google designed WebP as a replacement for other types of the image file. The images can still be compressed if needed, and it is also suitable for animations.
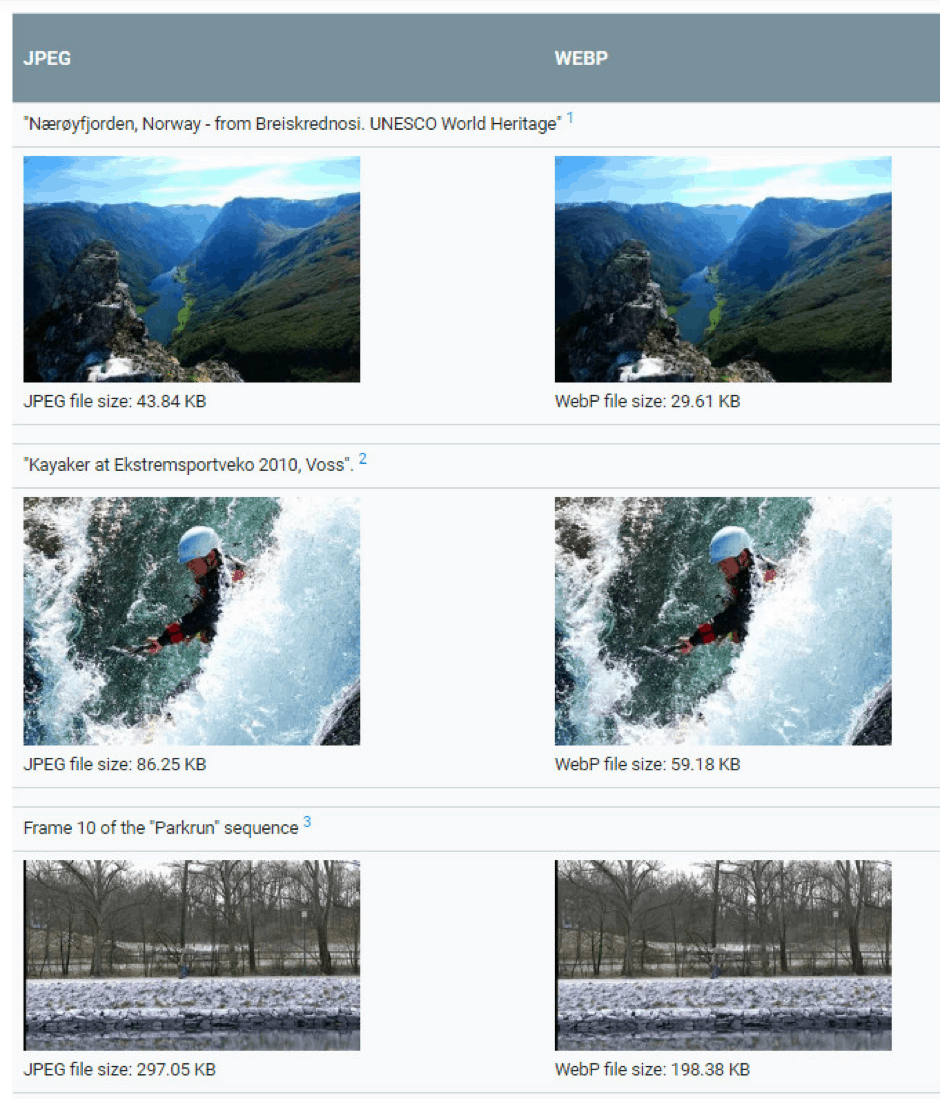
Examples from Google’s WebP gallery
WebP can encode an image with lossy compression by using predictive coding. A value of one block can be predicted by using the values of the neighboring blocks, and then it is only the difference that needs to be encoded.
Lossless compression is also available for WebP. New pixels are reconstructed from images that have already been seen. If no match is found, then there is a local palette that can be used.
When you use a format such as WebP to reduce the size of your images, you will find that your site is a lot more responsive. This will improve the entire experience of your visitors.
Why is WebP Not More Widely Used?
This raises the question of why everyone is not using WebP, especially when it has so many benefits?
Why are JPEG and PNG are still around if WebP can produce smaller file sizes of comparable quality? The main reason is that not all browser versions support the format.
According to Can I use…, the browsers that support WebP include Chrome, Firefox, Opera, Opera Mini, the Android browser, and Chrome for Android.
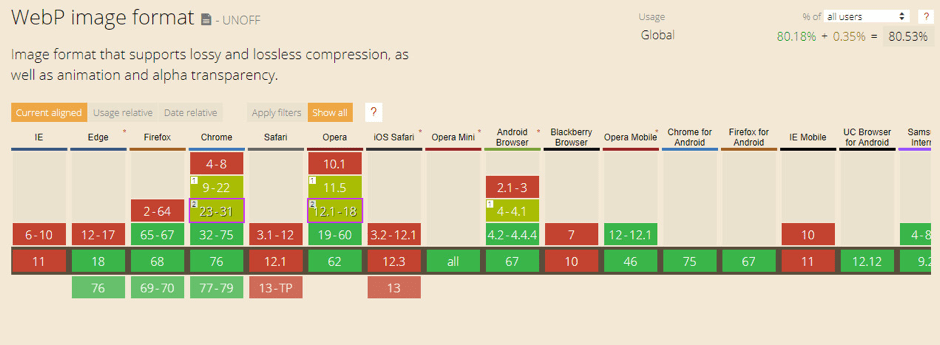
If you decide to use WebP, then there is a good chance that most of your users will benefit from the full features. Chrome has 66% of the market share of usage compared to other browsers.
So far, it is only Safari that has not announced any intention to support this format. Just because Apple doesn’t support WebP, doesn’t mean you should not use the format.
It’s possible to deliver WebP files to visitors who use supported browsers while displaying JPEGs and PNGs as a fallback to Safari users.
In this way, instead of delivering WebP to all users and risk Safari users seeing broken images, you can ensure all visitors see your images. While users, with supported browsers, will get a faster experience.
How to Use WebP With WordPress?
You will not be able to upload images in the WebP format directly to a WordPress site without getting an error code. This is because the format is not supported yet.
You can still use the WebP format on your site; you need to use a plugin.
METHOD 1 USING WebP Express plugin
The WebP Express plugin can be used to convert any image on your site to the WebP format. It will still leave the original format of the image on your website so users of Safari can access it.
This will work on all images on your site. Including, of course, also those that are in your galley and media library.
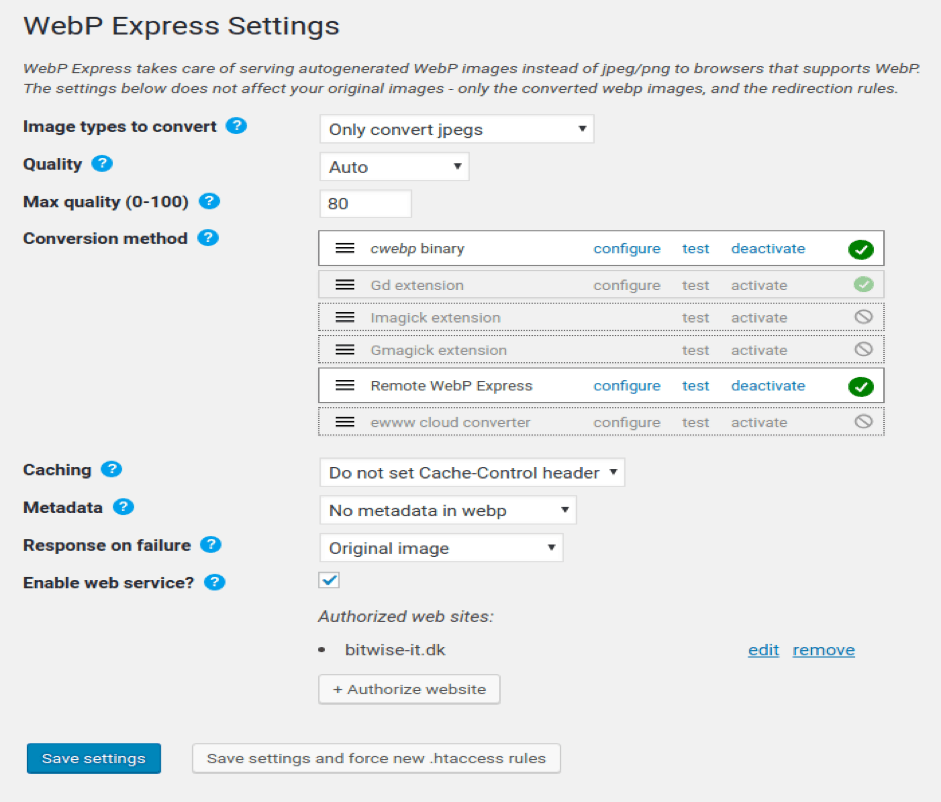
The WebP Convert Library changes the images. The WebP Express Plugin will act as a converter for the files.
This means that the images will be displayed in the WebP format if a supported browser accesses them. If not, they will be displayed in their original format.
METHOD 2 USING Jetpack’s Site Accelerator feature
If you have the Jetpack plugin already installed on your site, then you will be able to use this to convert images to the WebP format. JPEG and PNG images will be converted automatically.
Jetpack’s Site Accelerator feature (formerly known as Photon) automatically converts JPEGs and PNGs to the WebP image format. You’ll first need to make sure you have the Jetpack plugin installed and activated.
To use Jetpack, you need to link it to an existing WordPress.com account. If you already have an account, you need to log in.
In the WordPress dashboard, you need to select Jetpack from the sidebar and keep scrolling down until you reach the section named ‘Performance.’
Once you are in this section, you need to toggle Image Performance (Photon) for WebP image conversion, and then everything will be set up for you.
As this method is so easy, it seems quite surprising that it is not best-practice already. However, some people do not like the fact that WordPress CDN serves the images.
METHOD 3 USING Cloudflare Polish feature
If you have access to Cloudflare, then you can use their Polish feature to convert images to WebP.
Cloudflare users on paid plans can access the CDN’s Polish feature, which offers automatic WebP conversion.
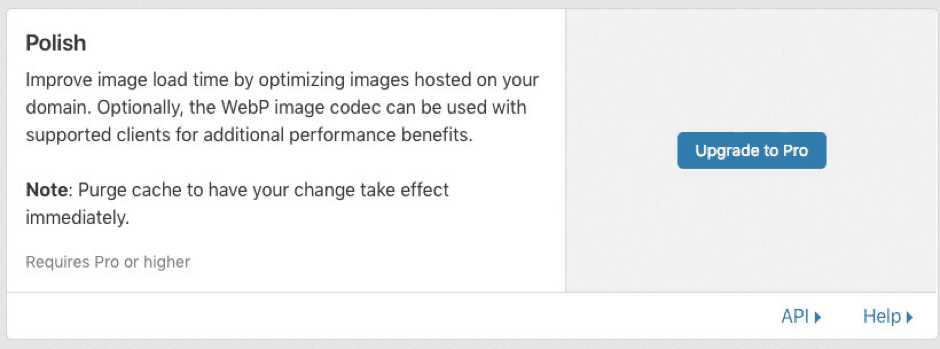
If a supported browser accesses the site, then JPEG and PNG files will automatically be converted.
METHOD 4 USING Imagify plugin
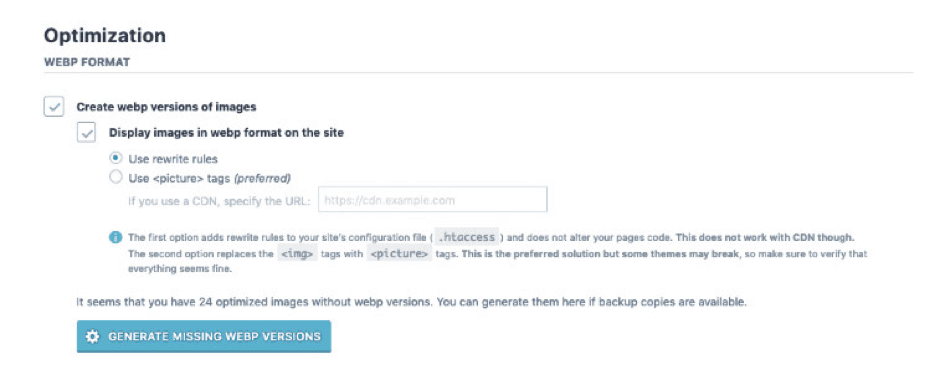
When you use the Imagify plugin to optimize your images, then you can tick an option in your settings to automatically create a WebP version of this image. This will also work for images in your themes and other plugins.
METHOD 5 USING Optimole plugin
The Optimole plugin can optimize all images automatically and will serve them through a CDN. This includes optimizing them in the WebP format.
If the visitors’ browser supports a WebP format, then this is the format they will see. If not, they will see the image in its original format.
You will not have to do anything with your images with this plugin as it does all the hard work for you.
You install the plugin configure it, and it will handle the conversion and the correct size. This service will handle the image size for you, and it will serve the right size.
METHOD 6 USING ShortPixel Image Optimizer
You can use Shortpixel to convert any image format into WebP, and this will not cost you anything.
This is even more impressive when you consider that they offer lossy and lossless compression.
![]()
It is also compatible with any cache plugin that is aware or WebP. Like most other plugins, it will display WebP images for browsers that support it and the normal formats for those that do not.
It also has an option to add the WebP images into the front-end pages using HTML. To do this, you can use the <picture> tag instead of the normal <img> tag.
To set it to convert images automatically, simply enable the feature in the Advanced tab. You can restore images if you want.
Enabling WebP On WordPress Summary
It should be the goal of every webmaster to have the perfect SEO score, and for their website load as fast as it can. Using images in the WebP format can help you achieve this.
It is growing in popularity, but it is still not supported on all browsers. However, it is still a format that is well worth using.
It has lossy and lossless compression and so can be used with JPEG, PNG, and GIF file formats. Still, it is one of the best ways available for reducing the size of image files without losing any of the quality.
It is probably not a good idea to rely solely on WebP for images without providing fallbacks for users with unsupported browsers. Without this fallback, your visitors will just see a broken image.
Currently, all major browsers support WebP in latest versions so there is no reason why not to take advantage of the benefits it offers.
- What Is WebP And How To Enable It On Your WordPress Website? - August 21, 2019
Where Should We Send
Your WordPress Deals & Discounts?
Subscribe to Our Newsletter and Get Your First Deal Delivered Instant to Your Email Inbox.
