
No matter what kind of business you own, excellent customer service is one of the essential things. If your customer is in any shape or form experiencing issues with your product and can’t reach you directly – then you will have a problem. The customer experience will be terrible, and we all know that you do not want that. We all want to provide our users not only with excellent products but also excellent support!
Now, millions of sites are using live chat to provide support, convert web visitors into paying clients, and improve their branding. This option makes clients feel seen and heard in the exact moment, and the customer experience improves drastically. After all, nobody likes sending an email and waiting for 2-3 business days to get a response!


Besides, people don’t like the traditional way of communicating with companies, such as phone support or email. Looking for the number or email to reach the right person, waiting for a response, being stuck on a call queue, repeating the same issue again and again – these add nothing but frustration to the customer service experience. Live chat, on the other hand, is a quick, efficient way to resolve the problem in real-time – and who doesn’t love that!
There are many live chat plugins for WordPress, but one sticks out, and we are here to present it to you! Without further ado, let’s jump in and review the fantastic plugin by the name of 3CX Live Chat.
About 3CX Live Chat

3CX Live Chat will help you bring your customer support to the next level. The plugin doesn’t only support live chat, but it aims to revolutionize customer communication by also offering a quick way to convert a chat into a call in just one click.
So, if your customers want to describe the problem in the smallest detail live, they will have the option to convert the chat into a video call or a regular call with the same agent. This option is something that differentiates this plugin from the rest of its kind. However, it is no secret that it has many other vital features that set it apart from its competition:
- Web, iOS, and Android apps
- Easy-to-use interface integrates calls, live chats, FB &SMS
- Ring groups
- Call queues
- Desktop notifications
- Missed chats and chat history
- Pop-out chat box
- Customizable design
- No advertising or powered by link
- No monthly subscriptions required
This is all possible thanks to the new 3CX StartUP edition that supports the live chat plugin and brings forward PBX features in a simple all-in-one solution. Plus, with the 3CX Web Client, you can access, track and store all of the customer communication without slowing down your WP site.
Now, in this article, we will show you how to use the 3CX Live Chat plugin so that you can start chatting with your customers and boost your customer support in no time!
Setting Up 3CX Live Chat
For the first phase of the installation process, you’ll need to create a 3CX account which can be done through your browser in a flash following these few simple steps:
- Sign up for your free account.
- Add your users or agents to the system and assign their roles (managers, receptionists, standard users). They will be able to interact with your users
- Determine if you’ll use a SIP Trunk, which is needed for inbound and outbound calls. If you’ll be using the system just for Live Chat and internal communication, just click “Next”
- Now you can start setting up your live chat by choosing the option “Yes” and selecting if you have a WordPress website or not. Enter your website URL and click “Set” if you have one
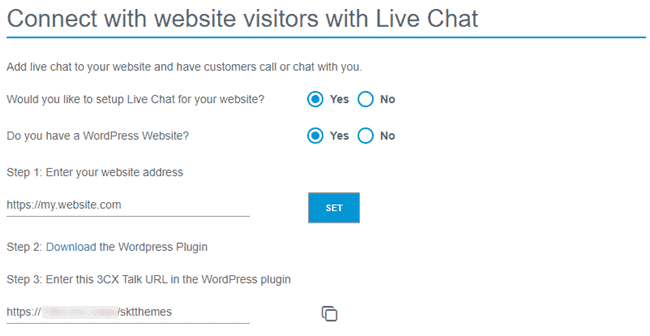
- You need to link the Web Client to the plugin, so download and activate the plugin and then copy the 3CX Talk URL and save it for later. The 3CX Talk link is what is used to connect your two platforms within the StartUP package (plugin and Web Client). It enables sharing data regarding chats, calls, and video calls. Everything is run through the browser, so there’s no need for telephone calls
- With that, you’re done. Using the “Login” button, you can access your dedicated 3CX Web Client, which is

Next, you’ll want to configure the Live Chat.
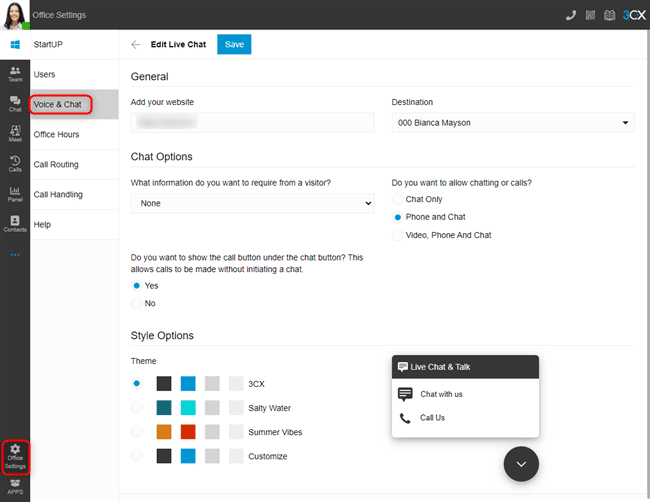

- Go to “Office Settings > Voice & Chat” and click on the pencil icon to set up live chat so that calls and messages can be answered through the Web Client
- Your website address will already be populated from the wizard process, but you can change it now or later if you need to
- The “Destination” field shows where live chat messages or calls will be sent. To change the “Destination,” navigate to “Office Settings > Call Routing” and choose your destination. By default, the live chat will be routed to a ring group, so someone will quickly answer any query
- Under the “Chat Options” section, use the drop-down selection to choose what information visitors need to provide beforehand
- Use the radio buttons to choose if you want to allow “Chat Only,” “Phone and Chat,” or “Video, Phone, and Chat”
- If you want the option for “Call Us” to be displayed immediately on the chat bubble, use the radio button to show or hide the option
- Under “Style Options,” choose from one of the 3 pre-defined themes or select “Customize.” For the last option, you’ll get to customize the color schemes in much greater detail
- Use the preview of the chat bubble to interact and test the functionality and click on “Save” to finish up
For now, you’re essentially done with the Web Client and can continue setting up the plugin to complete the whole installation process.


- Log in to the admin panel of your WordPress website
- Navigate to “Plugins” and click “Add New” at the top of the page
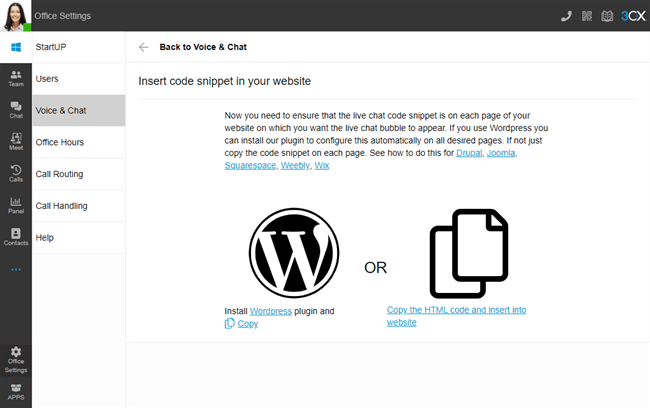
- Click on “Upload Plugin” at the top and choose the file you downloaded during the sign-up process. The same can be found through the Web Client in “Office Settings > Voice & Chat” by clicking the ‘i’ icon next to the pencil icon. Then click “Install Now”
- Once installed, click on “3CX Live Chat NextGen” in the sidebar
- Paste the URL you copied earlier (the 3CX Talk URL). If you haven’t copied it, you can find it again in the Web Client in “Office Settings > Voice & Chat” under the “Information” field or within the confirmation email
- Either tick the box to show the chat on all pages or use the tick boxes below to select individual pages. Finally, click “Save Changes,” and you’re all set

Live Chat Bubble Styling
Style settings are one of the things where you can have a lot of fun with. Here, you will be able to customize the way you want your chat to look. You can implement your own branding using different colors, chatbox positions to maintain the overall aesthetic appearance of your site.
In addition, if you get bored or want to change it, you will always be able to do so. A quick preview is always available for you to confirm the changes before you implement them.
Advanced Options
After the setup is complete, you will be able to make choices about more advanced plugin setup.
Some of the options that you can use are:
- Disable live chat option on mobile devices
- Chose the hours when the live chat is available
- Enabling Google Analytics
- Decide on which sites you want your chat icon to be visible
- Allow disabling the live chat on specific sites
- Offline message management
- Adding GDPR compliance
- If the customer is logged into WP, the live chat name and email are automatically filled
- Show or hide “Powered by 3CX”
Additional Chat Settings
If you look into the settings, you will also be able able to find some other options, such as:
- Configuring the time when you are available
- Enabling video and voice calls
- The opportunity to allow Gutenberg blocks
- Define the behavior of the chat when you are not online
Now, the chat should appear on your WordPress site. You should see it in the bottom right corner of your website.
Call and Video Options
To have this feature, you must configure it to have the option to transfer from a chat to a call (voice or video). The way to do that is through the settings that we went through earlier. But here is a reminder: Live chat -> Setting -> Advance features in your WP dashboard.
When you enable this option, during the chat with the agent, if the customers want to call you, they will have the option in the upper left corner of the chatbox. In this case, the calls will take place over the browser using 3CX Talk URL. This scraps not only the need to exchange numbers but also makes the calls completely free of charge for you and your customers!
You can also download an app for your mobile phone to take calls and chats on the go. This way, you won’t have to be stuck having to spend all that time staring at your PC. To do so, you need to go and download the mobile app for Android or iOS, open it and scan the QR code accessible via the 3CX Web Client.
Once you’ve done that, your account will be automatically configured, and you will be asked to perform a test call to ensure everything is set up properly. Once that’s done – you can start taking over client chats and answering calls right away.
Additionally, QR codes can be used to attract new clients to your company. Because they are now quicker, simpler, and more affordable to generate than ever before, using QR codes for marketing has never been more practical. Furthermore, your brand is extended through the QR codes you use for marketing initiatives. You may promote the identity of your brand while encouraging your referrals to scan.
3CX Web Client
The web client is designed to make it easier for small businesses to streamline their communication channels, especially those that possess only basic WordPress knowledge.
Aside from the simplified interface, the web client helps centralizing customer communication in an all-in-one hub by offering CRM, Facebook messages, and SMS integrations. This way, all agents have access to the updated client records and have a track record of all communications in one place, even if it takes place over different channels. Messages from all these sources are also traced through the client, so no additional resources will be required of your site.
The Web Client’s functions don’t stop at just messages. You’ll also get to manage pretty much your complete operation – actions such as adding users, opening chats, creating ring groups, starting calls, etc., will all be available with just a couple of clicks.
Accessibility is also a big benefit of the web client, surpassing that of the plugin (or WordPress in general). The client is “cloud native”, you can use it on the fly in any browser, it’s scalable to any device and screen (where WordPress struggles) through the browser access and handles navigation much easier because of the dedicated plugins.
In short, you’ll have a communications center that features multiple channels, enables staff management and tracking along with being conveniently available on your phone, which is to say, anytime, anywhere.
Pricing
While you will get almost all features of this service within the free version, the 3CX StartUP package comes in three tiers, depending on your needs:
| STARTUP FREE | STARTUP PRO 10 | STARTUP PRO 20 |
| Shared Instance | Up to 10 users | Up to 20 users |
| Up to 10 users | Own SIP Trunk | $275 |
| Video conferencing | Multi Level IVR | |
| 1 Ring Group | Call Queues | |
| 1 Auto-attendant | Reporting | |
| 3CX Talk Links | $175 | |
| Live Chat | ||
| Mobile Apps | ||
| $0 |
StartUP Free edition can accommodate up to 10 users, while StartUP PRO can be upgraded to handle up to 20 agents and include more sophisticated features such as multi-level IVR, call queues, and reporting.
However, access to the 3CX Live Chat is not limited to small companies only; for larger installations, 3CX offers a number of licenses that fit the needs of medium and large enterprises too. For more details, check out their pricing page.
Final Words
To conclude this review of the 3CX Live Chat, we must say that this plugin is one of the most flexible live chat systems you can find on the internet. It doesn’t limit you to a basic solution – there are options to customize its appearance and features to better fit your needs at any given point.
On top of everything, the chance to transfer live chats to phone calls or video calls is simply perfect for any business. It helps businesses prioritize internal efficiency and boost customer experience. Every business should put its customers’ needs first, and 3CX Live Chat can help you with that.