

Do you want a customized widget in WordPress? No doubt, widgets are extremely helpful to sort out your page and use the sidebars proficiently. Besides, if you want to give your website an attractive and professional look, widgets could help you. You can use your widget ready area or use certain plugins to create widgets. As a WordPress user, you have the privilege of using hundreds of widget plugin collection of WordPress. However, if you still feel void inside you, you can go through this beginner’s guide and learn how to create a customized widget.
What is a WordPress Widget?
WordPress widgets are codes that could be added to the widget ready areas or to the sidebars. You can consider them as a simple module to incorporate different elements with the use of simple drag and drop interface. While WordPress offers the privilege of using ready to use widget plugins, it also offers opportunities to create custom widgets.


Although you can take help from the WordPress support services, you can also create a custom widget of your own. Yes, you don’t need to be proficient in coding to create a custom widget. Just follow the step-by-step process discussed in this beginner’s guide. You can also open or download these codes from here to create your own widget.
Create a Custom Widget
Creating a widget is a simple task. However, the complexity occurs when you want to put several functions in a widget. In this article, we will discuss five basic steps of creating a widget with minimum functions. But before getting into any details, we will give you some advice.
Considering the fact that you are going to be changing your website’s code, it’s good to prepare for the worst-case scenario of something going wrong. Now how can you do that? Well, by using WP Reset.


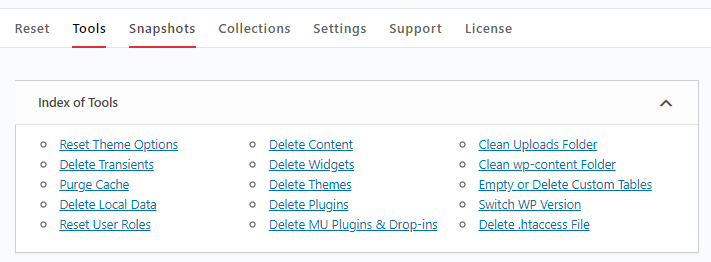

Best of all, it creates these things called database snapshots which you can then restore and take your site back to a previous, error-free state. Amazing right?
Another tip we have for you is to create an under maintenance page for your site. This will allow you to keep your widget creating process hidden from the public until you’re completely satisfied with them.
Okay, now that we have gotten that out of the way, let’s get back to business.
Step 1: Create the Plugin
You have two options while creating a widget; first, you can create a specific plugin to paste the widget codes. Second, paste the widget codes directly on the functions.php.file of your theme.
Hence, our first step will be creating a specific plugin for the widget. If you want to create a plugin, log in to your hosting site and navigate to /wp-content/plugins/. Besides, you can also create a hard drive and create it locally.
Create a new folder for creating a plugin and give a unique name so that it remains distinct among other plugins. For instance, we have selected “example-widget.php” as our plugin name.
Now open your plugin with the WordPress plugin editor or open it in the web host’s file manager. The first part of the plugin should have simple information about the plugin. WordPress can read this information and use it for different uses. Here is the format for inserting information.
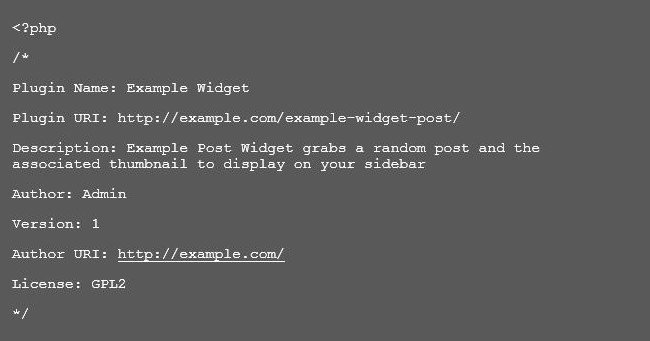

As you can see most of the information used in the plugin are self-explanatory, it is fair to change them according to yourself. The plugin URI is the place where you can dedicate a page about the plugin. You may start with 0.1 and develop it step by step. If you want this plugin to be accepted by the WordPress directory, it should be GPLv2 compatible. If you are using GPLv2you can copy paste the following message on the header (of course it is not mandatory) and custom the first line using your information.


Step 2: Creating the Widget
Now, you have just set up the base of your widget. As a second step, you have to create the widget box. For this, create you widget class with the unique name you have selected for the plugin. For this, replace the hyphens with underscores and add _widget at the end. Following is the code you can copy paste but don’t forget to replace class name with yours.


After pasting this code, you will observe the appearance of “Example Post Widget” on your website. You can change our widget description with yours.
Step 3: Input Arguments
This section is hugely dependent on the variables that you may come up while deciding what types of information you need to collect. Leave the title as it is and put a function to modify the widget. You may have noticed we have left a place called “WIDGET CODE GOES HERE.” At this place, we will add functions. For our widgets, we have decided to add some permalinks (of random posts) that can attract the viewers. Here is the code:


If you want, you can put other arguments or create checkbox at the same place just replacing our codes. However, if you copy paste the above code you will get a text with hyperlinks, which lead to other pages/blogs/events.
What if you want to put an image within the widget? We thought of this possibility. So, here is the code that you can use to input an image in your widget box:


Yes, again you can copy paste this code to get the same result. However, we will recommend you to select an image that goes nicely with your website.
Step 4: Incorporate Theme Support
WordPress offers privilege to the theme authors to style widgets as they wish. Hence, we will certainly take advantage of this opportunity. The block code will be like:


Please note that we again left a place under widget output called “WIDGET CODE GOES HERE.” At this place, you have to put main code that will determine widget display and its function.
Step 5: Widget Installation and Testing
After coding your plugin save the file and open the plugin section of the WordPress site. You will find your plugin waiting for activation. Gather your courage and click the “Activate” button. If you have done everything perfect (good luck!), you will receive a message showing that your plugin is activated. But, if you have made any mistakes, you have to go through the codes again and solve the issue. You may also take significant help from WordPress website maintenance services. After resolving all of the kinks, you will be able to use the plugin.
You can open or download these codes from here to create your own widget.
The Sum up
Widgets are necessary for increasing user experience. If you can learn how to create a custom widget, you will be able to improve the look of your site. From our experience, developing a widget is one of the easiest tasks in WordPress website development. However, to make it avail for the common people, we have offered a simple guideline of making a widget through this blog. We hope, with this beginner’s guide, people with limited or no coding knowledge will be able to create a widget. Alternatively, you can use the click to call widget and other plugins for adding it to your site.


- Beginner’s Guide How to Create a WordPress Widget - July 24, 2017