
You’re so close!
You have an awesome website built with WordPress.
You’ve got interested readers.
And now you’re utilizing the membership features in WordPress so your visitors can create their own accounts.
What happens next?
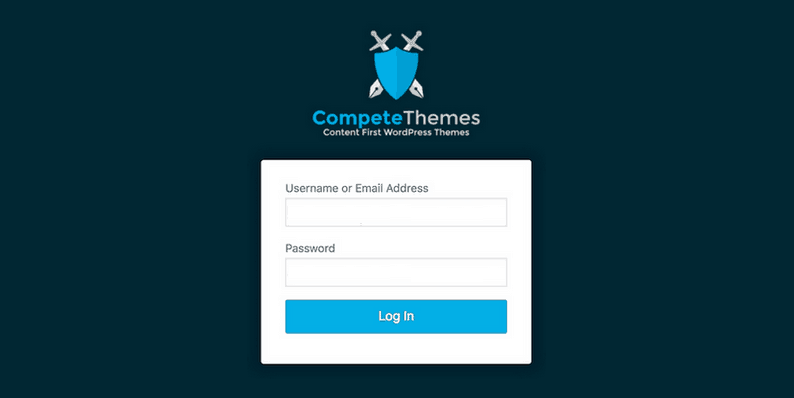
They go to register or login and they see this:


You’ve probably invested a lot of time and resources in designing your website by getting the top-notch images from Depositphotos or Pixlr, followed it up with software like Crello to make sure that everything looks neat, but despite the professional appearance of the rest of your site, this totally unbranded login page can kill the premium quality of your site.
Don’t mess up your user experience with a basic login page.
In this tutorial, you’re going to learn how to customize every aspect of the default WordPress login page. I’ve already tried a handful of solutions and selected the most intuitive (and free) option.
Keep reading to see how to customize your WordPress login screen now!
Customize Your Login Page
You’re probably curious to see what the end product looks like.
You’ll have plenty of freedom to customize your login page however you want, but here’s an example login form you can create by following the steps in this tutorial:


The most important part is that you can change out the WordPress logo with your own and customize the colors. For a membership site, users won’t even know you’re using WordPress because your form is completely branded.
Since customizing the login page is a fairly common request by WP users, there are a lot of excellent plugins to choose from. However, there’s one in particular that stands out in my opinion.
Choose the Right Plugin
I found that most WordPress login screen customization plugins are confusing or overly complex to use.
The plugin that strikes me as having the best balance between flexibility and simplicity is the Custom Login Page Customizer plugin by Hardeep Asrani.


Throughout the rest this guide, you’ll get an overview of this plugin and how to use it to create a login page just like the one I shared above.
Install & Activate the Plugin
In your WordPress dashboard, visit the Plugins page and click the Add New button at the top. Then search for “Custom Login Page Customizer” and click the Install Now button on this plugin.


You’ll see some other plugins available as well. Feel free to try them out, but after some testing, I think Custom Login Page Customizer is best.
Once you install the plugin, the button will update to an Activate button which you can press to finish the installation process.
Where to Find the New Settings
Custom Login Page Customizer doesn’t clutter your dashboard with a new top-level menu item which is nice. If you hover over the Appearance menu item, you’ll see a new Login Customizer option. Click this and you’ll be taken to the new settings in the Customizer.


Rather than creating a new admin menu, you’ll find the new settings added along with your theme’s customization options in the Customizer.


That’s a screenshot from the Challenger theme with this plugin activated. You can see how this creates minimal impact on the usability of your admin menu.
Pick a Template
When you click on the Login Customizer section, the login form will load instantly and you’ll find a series of sections for customization.


Let’s check out the Templates section first.
It has three different pre-designed styles available.


When you select a template, all it does is update the settings found in the other sections. In other words, you can choose whichever template looks the most like the final design you want to get the job done a bit faster. I’ll be sticking with the default in this guide.
Now let’s move on to some of the real customization work.
Change the Background
When editing the background, you can choose between a static background image or a color. In my case, I’m going to update to the color to match the dark bluish gray found on the Compete Themes website header.


Using the same header background color is a good choice since it will create a consistent aesthetic and you know your logo will look nice against it.
Add Your Logo
Adding your logo is the most important step in branding the form. If you don’t use any of the other customization options here, make sure to implement this one.
Custom Login Customizer has a great selection of features available that let you select the logo image and resize it so it fits perfectly. You can even update the space between the logo and the form, and customize the URL the logo links to.
![]()

With the background image and logo switched, the logo form is already looking highly unique.
To be fair about this part, I did find the logo sizing tools to be a bit tricky to use. You’ll want to resize your image beforehand and know the exact dimensions you’re going to use so you don’t stretch the image with the width and height settings.
Next, we’ll edit the size and design of the form containing the button and inputs.
Customize the Form
You can change the background color of the form or give it a background image of its own. Personally, I think the plain white background is fine so I left that the same, but this could radically change the look of your WordPress login screen.


I modified the dimensions of the form a bit, made the box-shadow darker, and added a 3px border radius to round the corners of the form a bit.
These changes were pretty subtle, but they still help to further brand the form.
Update the Fields
Personally, I’m fine with the way the fields look, but I’ve never been a fan of the “Remember Me” box. I removed that element entirely using one of the settings available in the Fields section.


Once again, there’s an awesome variety of customization options here. I didn’t bother touching any others besides hiding the “Remember Me” checkbox.
Customize the Button
The button is another good opportunity to brand your login form.
At this point, the button stands out because it doesn’t match the colors of the logo and background.
I switched out the background and border color the button. In addition, I changed the text shadow color of the “Log In” text and resize the button to be a bit larger.


We’re getting closer to a fully branded login page now!
Edit the Links Below the Form
The last section with simple customization settings is the Other section. The options you’ll find here primarily customize the links that show up before the form.
While you’ll probably want to leave the Lost Password link, the Back to Website link has always seemed unnecessary to me since the logo is already linked.


I’ve removed the site return link, lightened up the lost password link and also made that text a bit bigger.
Center Elements With CSS
At this point, I’m pretty happy with my new branded login form.
However, I don’t like that there are multiple text alignments. This is causing the page to look a bit messy.
Custom Login Customizer does not include options to center the button and password link, but there is a Custom CSS & Javascript section available.
I added some CSS like this to center both:


Here’s the CSS if you’d like to make the same customization to your login form:
#loginform .submit
text-align: center;
}
#loginform #wp-submit {
float: none;
}
#login #nav {
text-align: center;
}
Final Touches
The button looked nice being centered, but I still didn’t like the way it created new alignments on the page.
To complete the design, I switched the button from 96px wide to 100% wide using the Button settings. Then I added a little bit more bottom padding in the Form section to create the final look:
With those final updates, the button is easier to click on desktop and mobile. Plus, the login form is now completely customized to match my brand and create a better user experience for my visitors.
Now It’s Your Turn
With the Custom Login Customizer plugin, making dramatic or simple changes to your login form is pretty simple.
I’m happy with how my new login form turned out and it didn’t take long at all.
Branding your WordPress login screen can give your site a much more professional appearance to visitors. Without seeing the WordPress logo at login, it will feel like your own platform.
Do you have any experience with login customization? Have any questions about this tutorial? Post your thoughts and feedback in the comments section below.