How to Setup a Logo Slider for Your Website – A Step by Step Guide
Before purchasing any product from online, visitors logically remain in thoughtful, whether the product is predictable/branded or not. They look at some considerable elements for making decisions. It’s a human nature to follow others- what they are doing. If reputed one walks in a way, the most of the people are persuaded automatically to do accordingly.
In this context, a WordPress logo slider plugin can help you to build people’s belief. How can it make the whole work easy for you? A logo slider works to display the logos of your customers or clients. When visiting traffic notice the reputed logos on your site, then they become convinced to buy your products as famous entrepreneurs are confident on you buying your products. So, you need a logo slider plugin. Now the question is how to set up a logo slider for your website? That will help you to develop your credibility and increase sell as well.
Hope you are a WordPress user, after installing WordPress you have to set up a WordPress plugin. Plugins are used to speed up the workability of your website like as add a photo gallery, logo showcase and so on. A lot of plugins are available for you among them some are free and others are paid to add your site. A watchfulness to you that, you cannot install plugins when you are the user of WordPress.com, you have to use self-hosted WordPress.org and for this, you need to march from WordPress.com to WordPress.org.
Things to Consider Before Choosing a Logo Slider
Before setting up a Logo Slider, you need to check out the 3 important points. Check out below.
Display Mode: The display mode is very important for a Logo Slider. There is some common display mode are available. These are: Horizontal Slider, Vertical Slider, Filter, Grid, List etc. So, before choosing a perfect Logo Slider plugin you must check out the Display Mode option.
Responsiveness: The web market is filled out with a different type of devices. So, it’s very important for you to make sure if the plugin is Responsive or Not. If the logo slider is not responsive, you must avoid it.
User Interface: User Interface or UI is also a strong part to make a logo slider perfect and stand out. If you can use it easily, you can create a beautiful logo slider for your website.
Setting up a Logo Slider for Your WordPress Website Is Simple
Check out the Step by Step Guideline Below.
First of all, login to your WordPress Dashboard and go to Plugins from the sidebar. Then click on “Add New” and search for a logo slider. We have used here “Mi Logo Slider”. Because it is a simple, fast and user-friendly best logo slider plugin to showcase logos on your site. After appearing the Mi logo slider in the search result, click on the “Install Now” button to install. If the plugin installs properly, you see an activate button. After that click on the “Activate” button to activate the plugin in your dashboard. You can see a screen like the first one in the screenshot below.
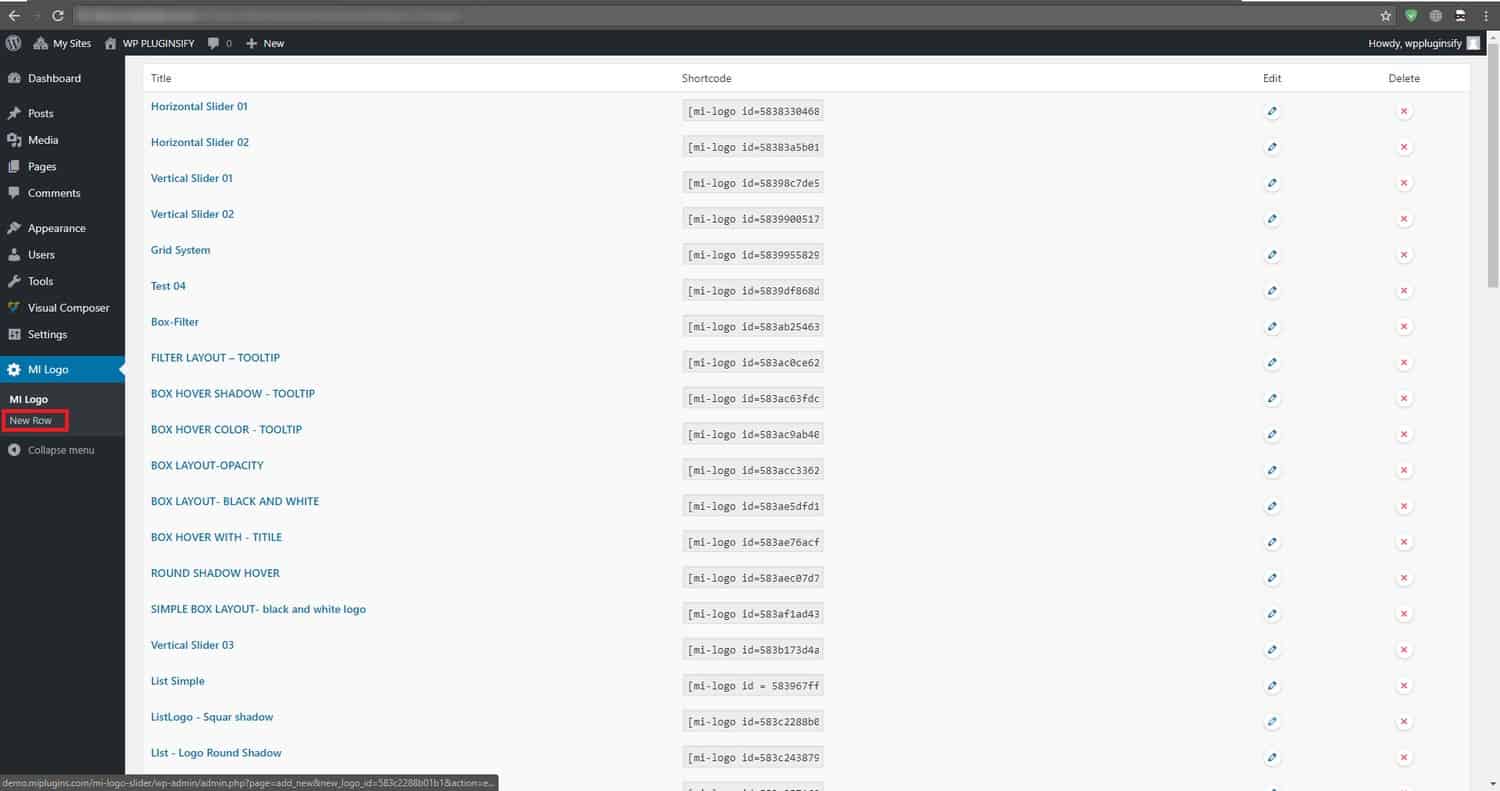
Once activating the plugin, Navigate to the “Mi Logo” option. You can see there are a number of Logo Sliders are already created. To create a New Logo Slider, click on the “New Row” button under the “Mi Logo” plugin. Look at the below screenshot for clear conception.
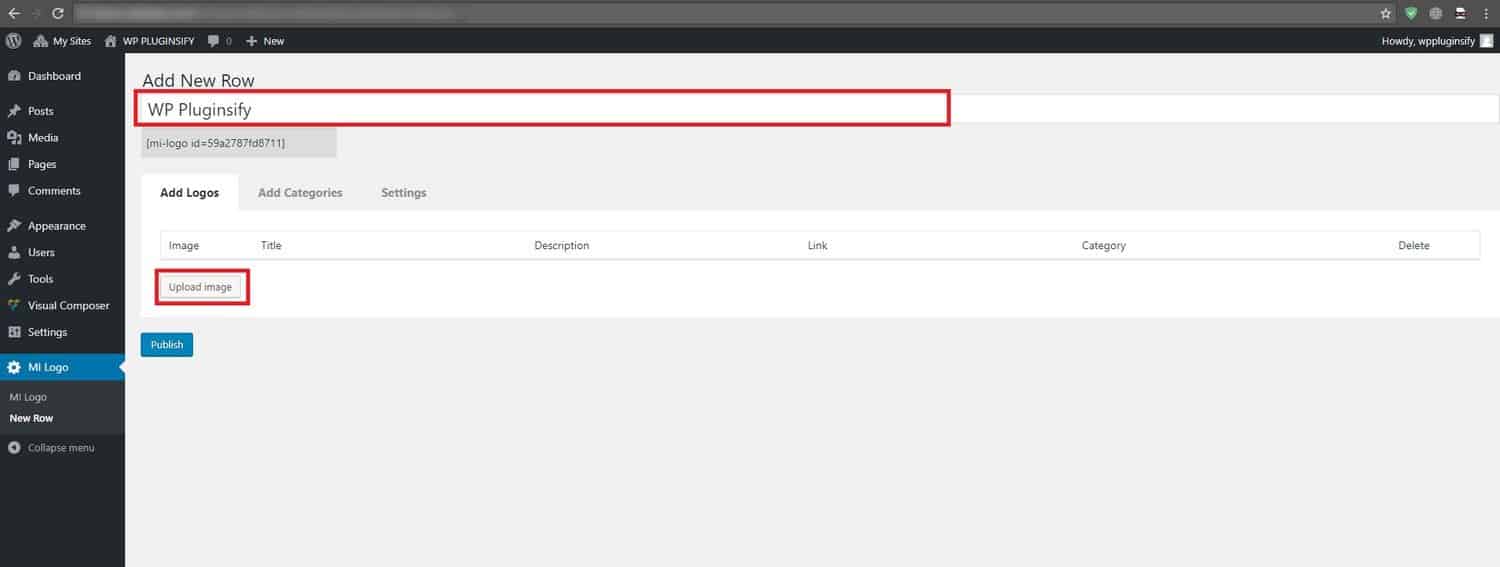
After clicking on the “New Row” button, you will get a fresh logo slider admin panel. Give it a name. We have named it as “WpPluginsify”. Later, click on the “Upload Image” button to upload your desired logos.
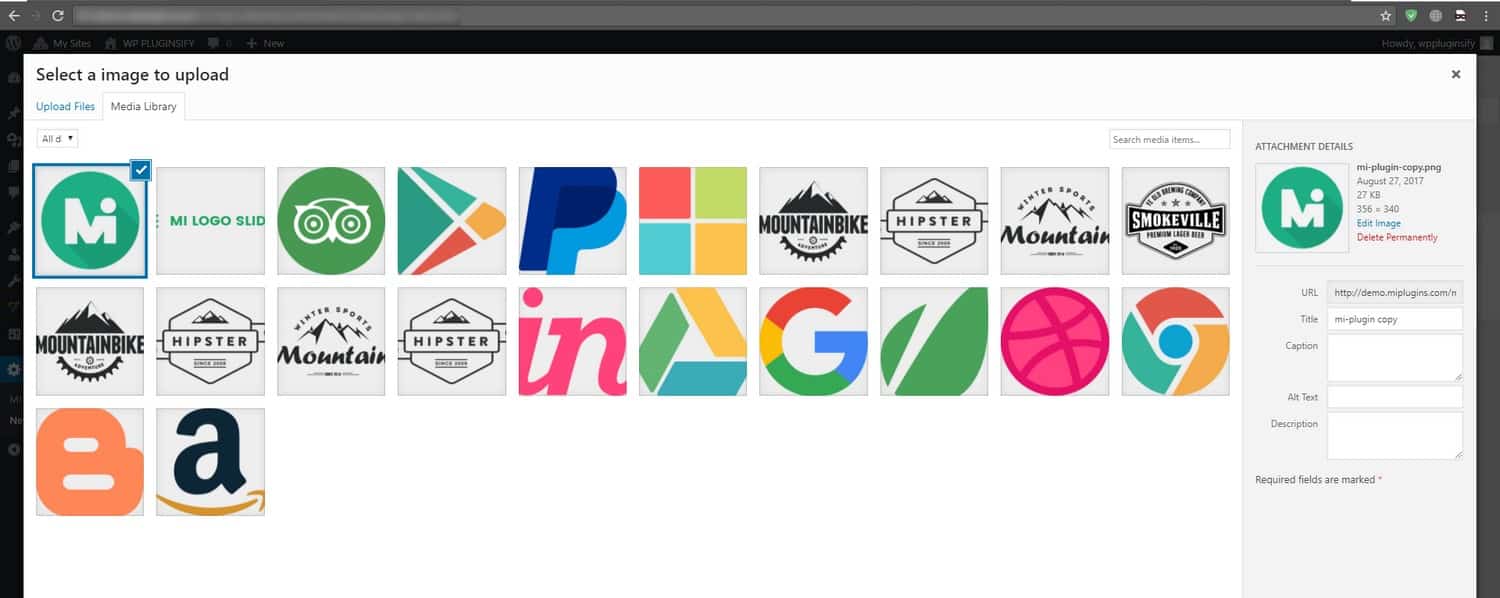
Subsequent to clicking on the upload button, this window will appear. I think I don’t need to explain it more to you. It’s simple, just click on the button “Select File” and upload your logos one by one.
WOW! It’s awesome. You have done. Our logos are uploaded in the meantime, and we will add it to our logo slider. Select an image and click on the “Use the image” button. We have selected just one image/logo here, for your easy and better understand. You can add loads of images at a time if you wish for.
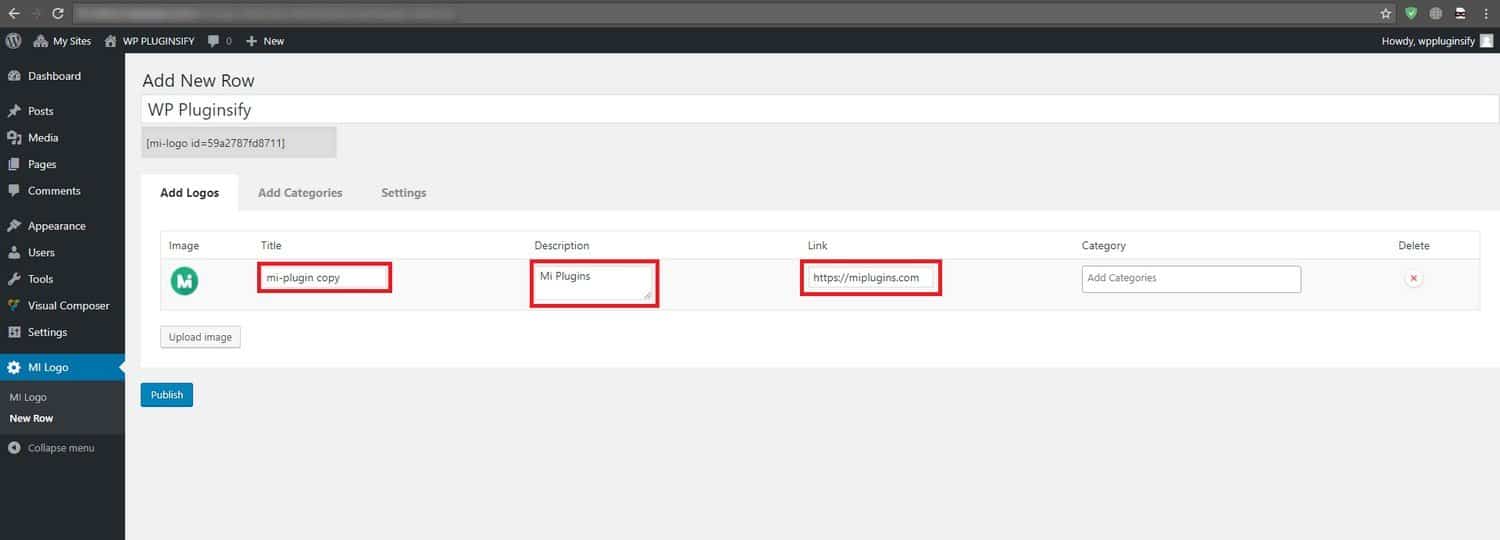
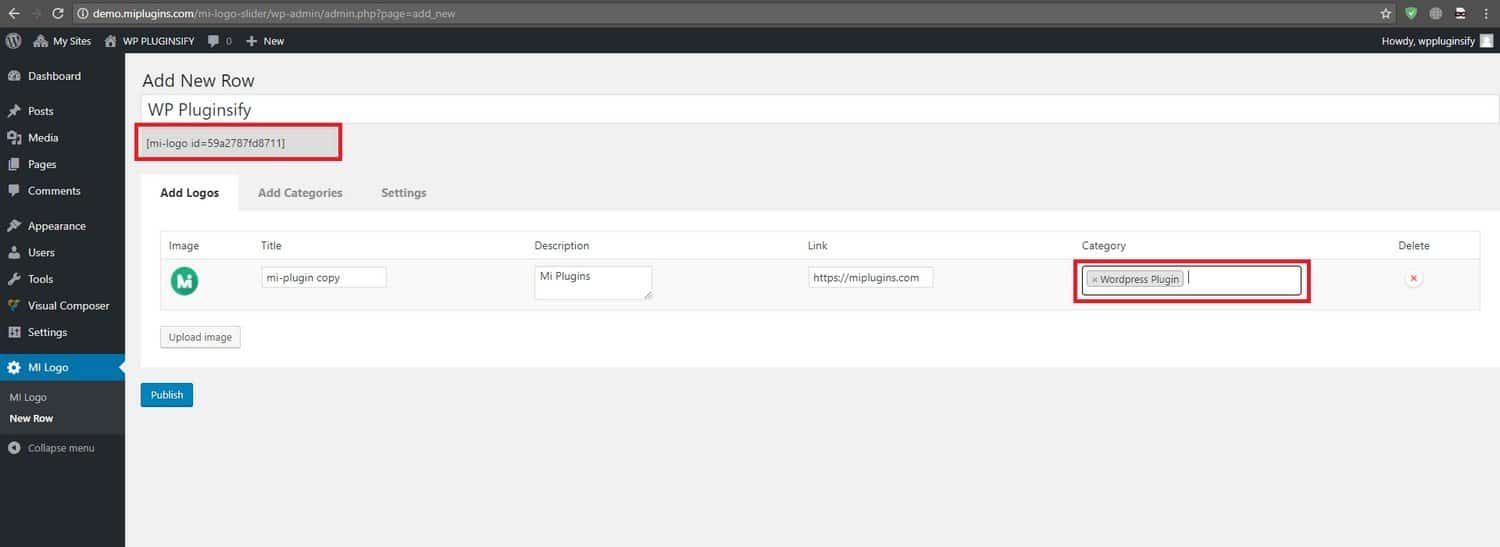
Okay, our logo was added. Then, it’s time to fill-up the required information like Title, Description, and Link. Remember, check your Link/URL carefully. If not, your link will not work properly.
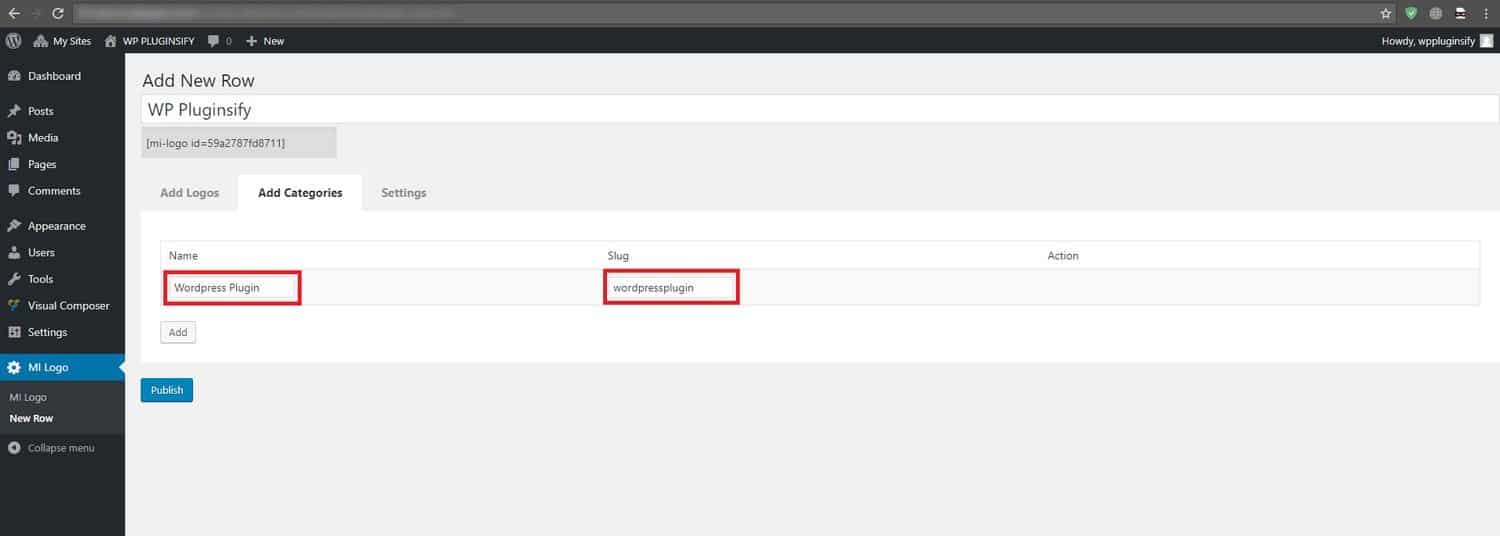
After that, move to the next tab “Add Categories” to add a category. Though, it’s not mandatory. But, it will help you to sort out your logo slider easily. Just give a name (Slug will add automatically) and go back to the previous tab.
Finally, you see our recently created category has added here. Following that, click on the publish button and copy the shortcode EX: [mi-logo id=5838330468690] to use it wherever you want on your website.
Now it’s time to add this Logo Slider anywhere on your WordPress website. Just go over these following steps sincerely.
- Go to WordPress Dashboard and create a new page.
- After clicking on the “Create New page”, Give it a title and Paste the shortcode which you got from Mi Logo. Slider. Example: [mi-logo id=5838330468690]
- Now click on the publish button and View the Page.
- You can also add the Logo Slider to an existing page, sidebar, widget or even the footer.
Final Words
Plugins are the best part of WordPress, that helps to expand WordPress and to build a truly great website. The work is to set up a Logo slider plugin really a simple work. Just to follow the guidelines how to proceed step by step to accomplish it. Once you can do that, you can able to run a powerful site. Check out a demo here.
We hope our above step by step procedure helped you to set up a logo slider for your website, as we covered everything you need in this installation process. If you have any further query, you’re welcome to submit your minds in the comment section.
- How to Setup a Logo Slider for Your Website – A Step by Step Guide - September 22, 2017
Where Should We Send
Your WordPress Deals & Discounts?
Subscribe to Our Newsletter and Get Your First Deal Delivered Instant to Your Email Inbox.


