Migrate from WordPress.com to WordPress.org
WordPress is the most widely used Content Management System. It covers more than 26% websites over the internet. Many first time users are confused about WordPress.com and WordPress.org. Therefore, today, Let me cover a few basic differences between them.
WordPress.com
It is a service, powered by a well-known web development agency – Automattic. In WordPress.com, All you need to do is sign up, drag and drop elements and your WordPress website is ready. But in the free version, you’ll have a predefined customized URL offered by WordPress.com. URL will look something like example.wordpress.com. You can further add your own domain to it.
Aside from URL, you are also restricted to use their own recommended services, themes, and plugins. This means that you cannot install your own customized or third party themes and plugins. It is purely managed by Automattic.
WordPress.org
On the other hand, WordPress.org is home to an open source web development software. In order to make use of this service, you need to download files from WordPress.org and upload them to any hosting provider. Install it and your WordPress website is ready. You can now add any theme, plugin, third party service or even integrate your own developed stuff on self-hosted WordPress.org site.
Why Switch from WordPress.Com to WordPress.Org?
As I have discussed above, WordPress.com restricts you on basic features only. If you want to extend those features, you need to have your own self-hosted WordPress in which you can do whatever you want.
How to Migrate from WordPress.Com to WordPress.Org?
Migrating from WordPress.com to self-hosted WordPress.org isn’t a difficult task. In this tutorial, I will explain, how you can easily migrate your website to self-hosted WordPress.org.
Don’t Have a Self-Hosted WordPress? Not to Worry!
There are a number of hosting providers that offers 1-click WordPress installation to their customers. In our example, we’ll use Cloudways – A Managed Cloud WordPress Hosting that also offers WordPress installation in just 1-click. Here is how easy it is to install WordPress on DigitalOcean via Cloudways.
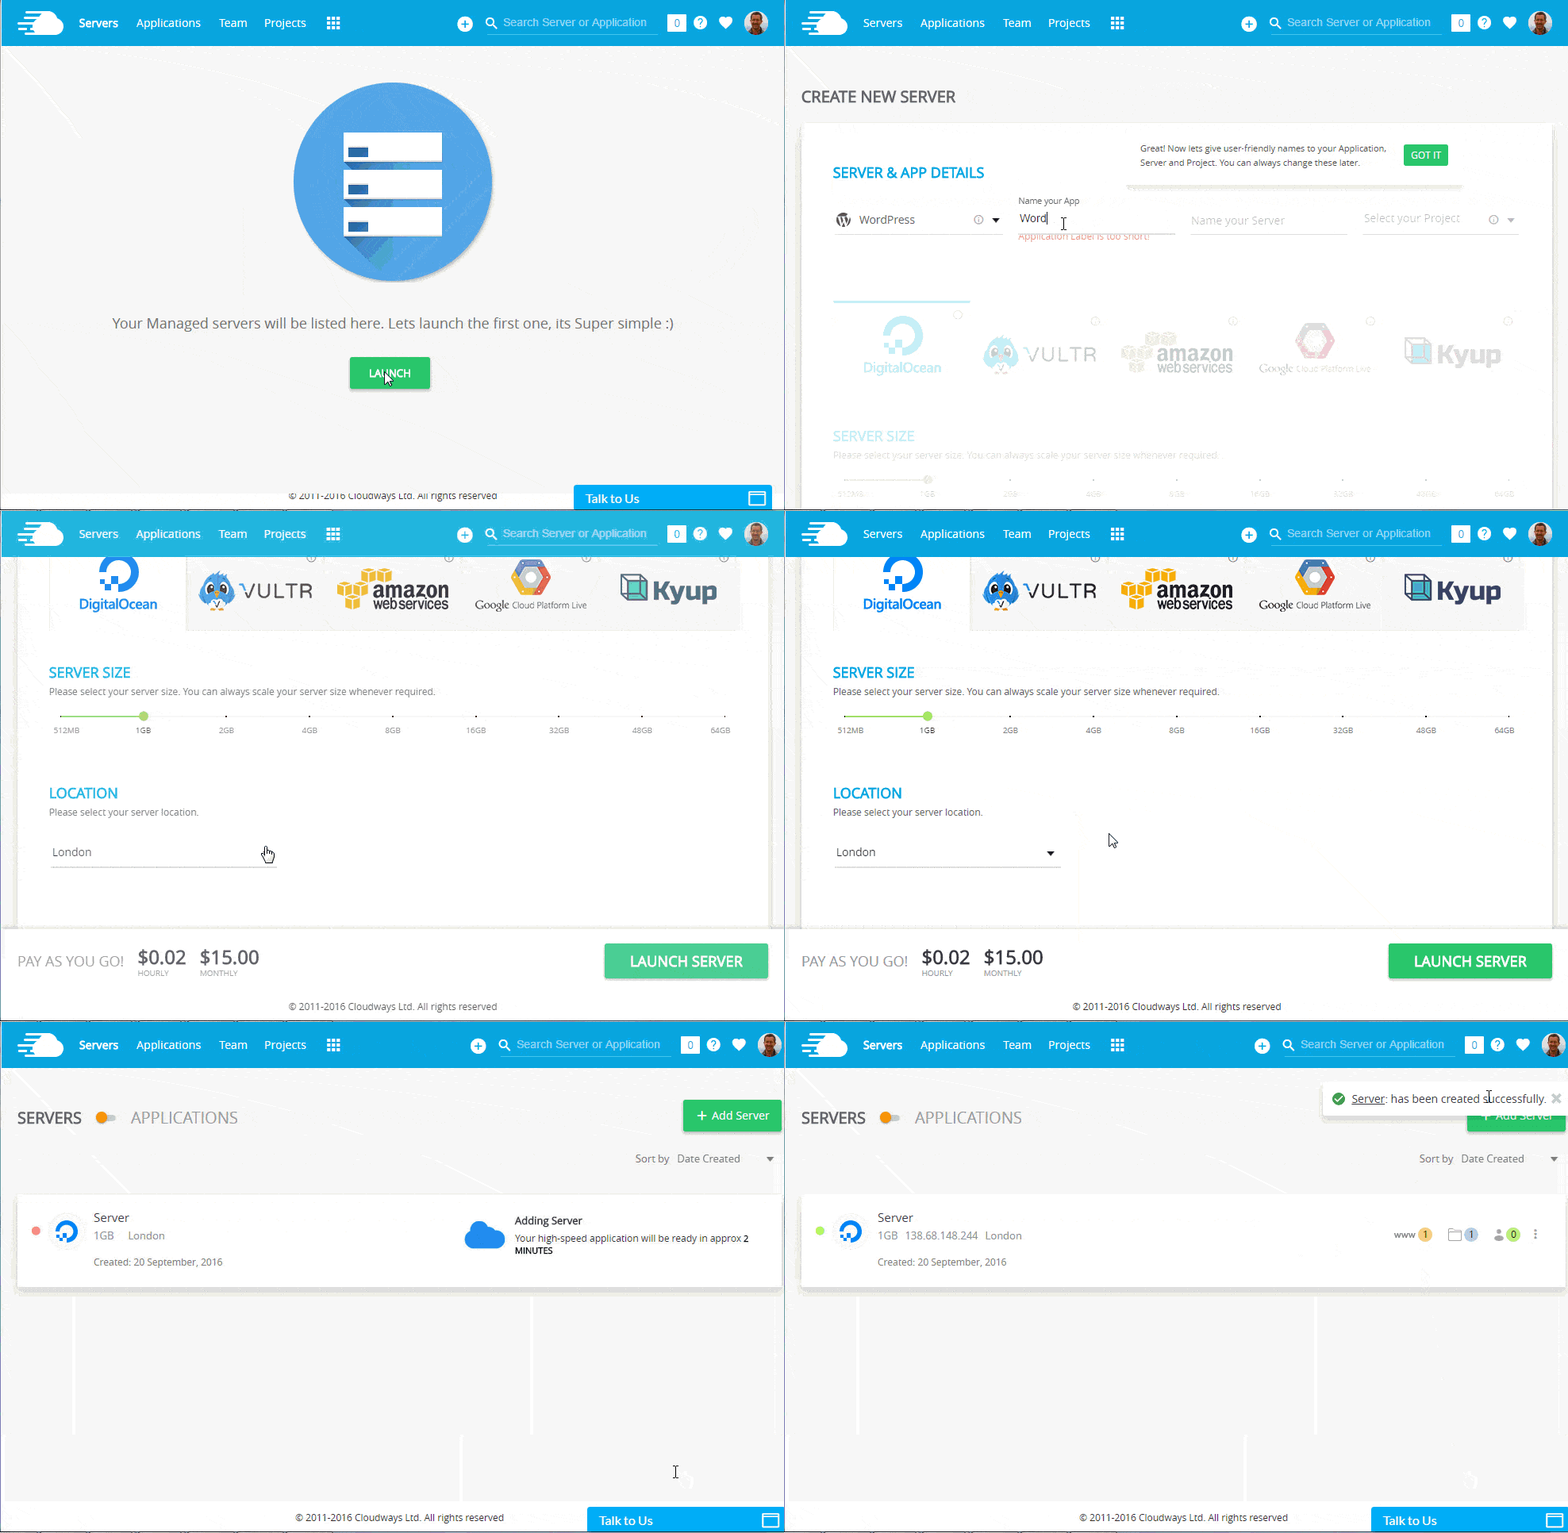
If you don’t have a Cloudways account, you can follow this guide on How to Install WordPress on any Linux Distribution.
We’re assuming you have successfully installed WordPress on your hosting platform. Now, let’s begin with the migration process from WordPress.com to self-hosted WordPress installation.
Export Content from WordPress.com
Login to your WordPress.com account. From the left pane, navigate to Settings -> Settings -> Export All. It will take few moments to compile all your data.
P.S: We’ve selected Export All, as we want to move the complete website. You can also move custom specific data only.
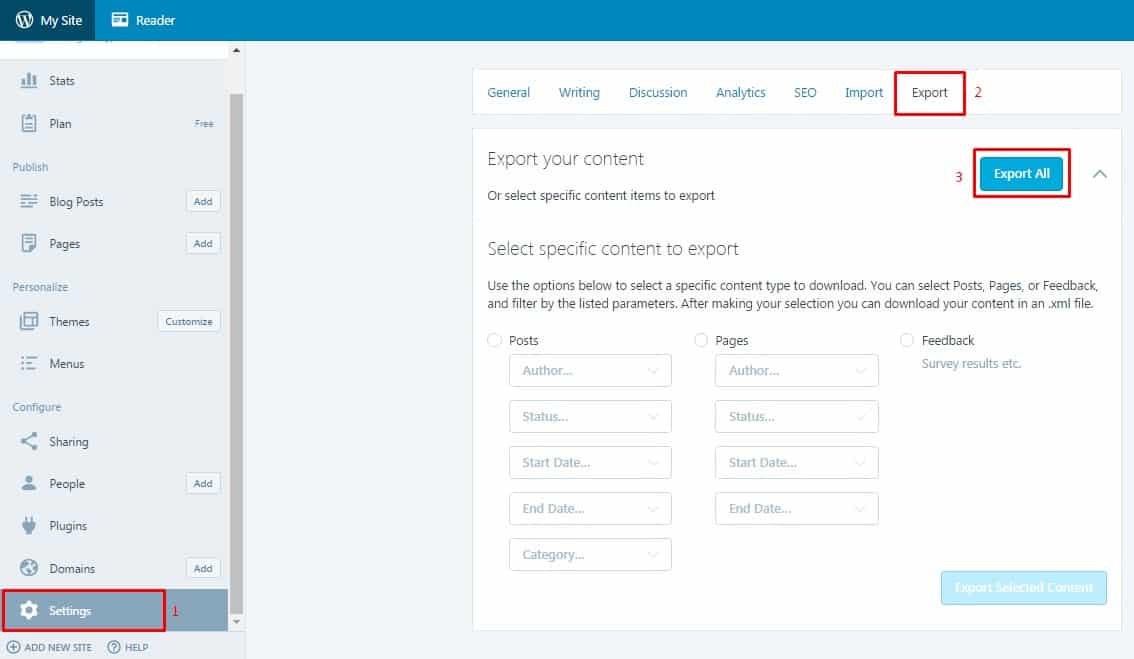
It will take just a few moments depending on the amount of data on your WordPress.com. Once completed, a new notification will appear. Download and Extract it. You’ll find an XML file.

Import Content to Self-Hosted WordPress.org
Once done with the exporting of data, Login to your self-hosted WordPress Dashboard. From the left pane, navigate to Tools -> Import -> WordPress.
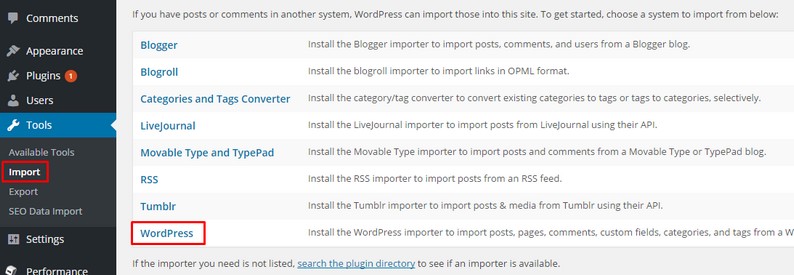
A new popup will appear, asking you to install WordPress Importer. Click on Install Now.
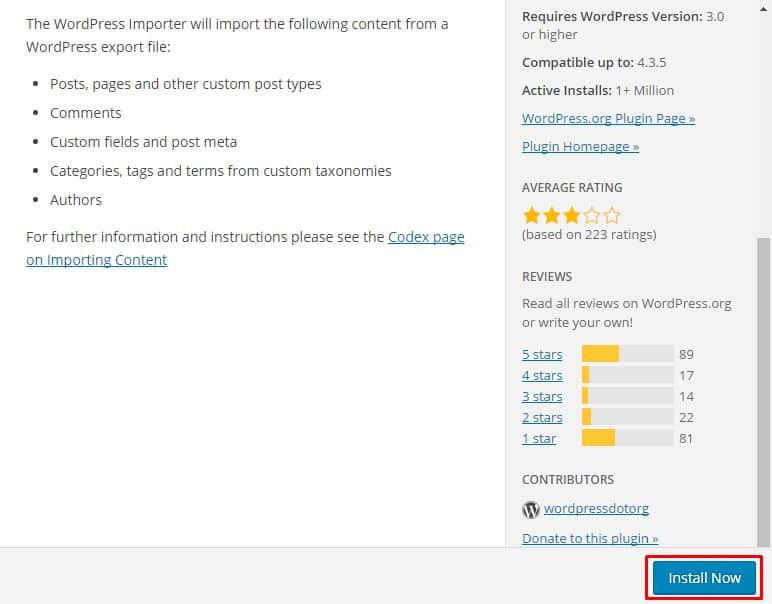
Once installed, click on Activate and Run Importer. It will ask you to choose the files you want to be imported. Browse the XML file that we have downloaded earlier. Click on Upload File And Import.

As you can see, the maximum file upload limit is 10mb only. This varies from one hosting to another. If your XML file is more than 10mb, you need to increase the file size uploading limit. As in our example, we used Cloudways. If you are also a Cloudways customer, you can easily increase by navigating to Servers -> Settings and Packages. Under basic, increase upload size limit to whatever server size you want.
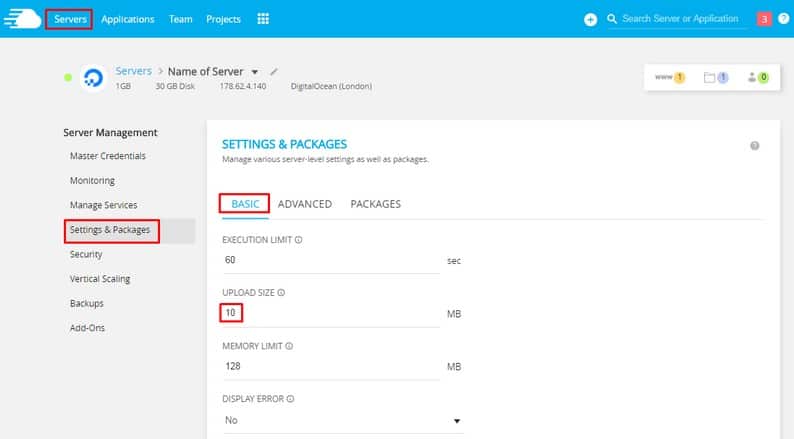
If you are using a cPanel based hosting provider, it can be changed by modifying the functions.php, config.php or .htaccess file. However, if you are a non-tech website owner, feel free to ask your hosting provider to increase your file size upload limit.
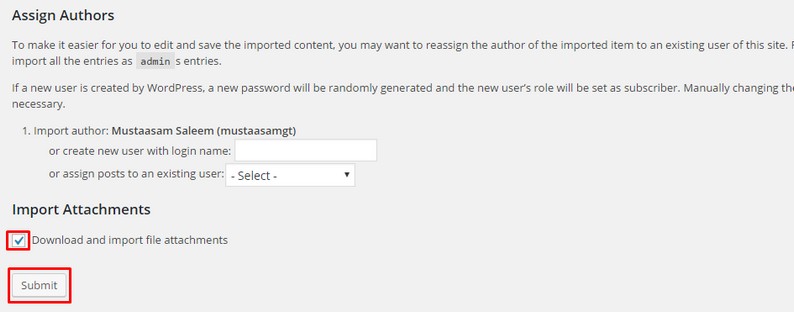
After successfully importing all the data, you can also change authors of your posts. Under import attachments, check Download and Import File Attachments and click on Submit.
Import Images:
After setting up everything. You might observe few images are still not migrated. For that, you need to make some extra effort. Just install Import External Images and follow onscreen instructions to import images.
Adding Theme:
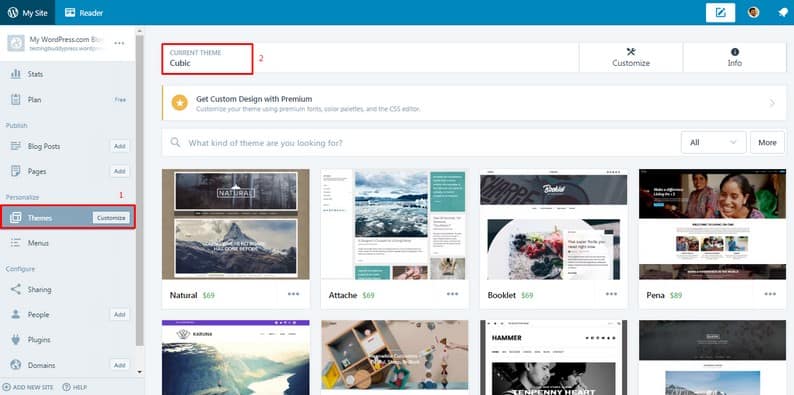
After successful migration, you might be worried about your theme compatibility. But, don’t worry! Go to your WordPress.com dashboard. From the left pane, navigate to Themes. You’ll see the name of your current theme at the top of the screen.
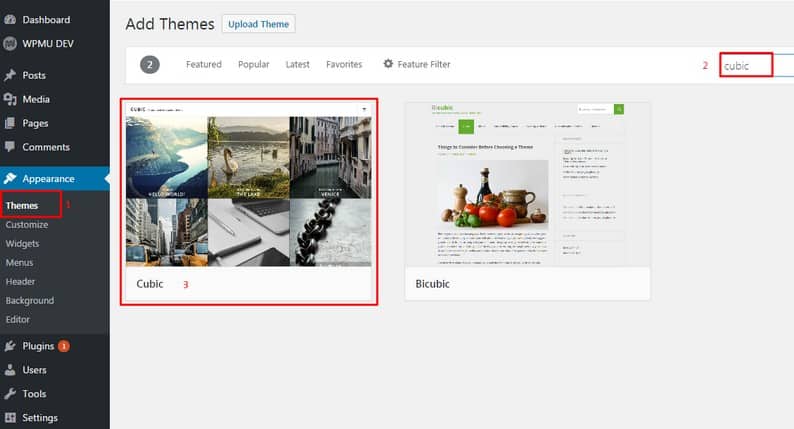
Now, go back to your self-hosted WordPress site’s dashboard. From the left pane, navigate to Appearance -> Themes. Search for the theme that you’ve on WordPress.com. In our case, it was “Cubic.” You can see that the theme is also available on WordPress.org repository. Install and Activate it and check if everything works perfectly.
Still Missing Something?
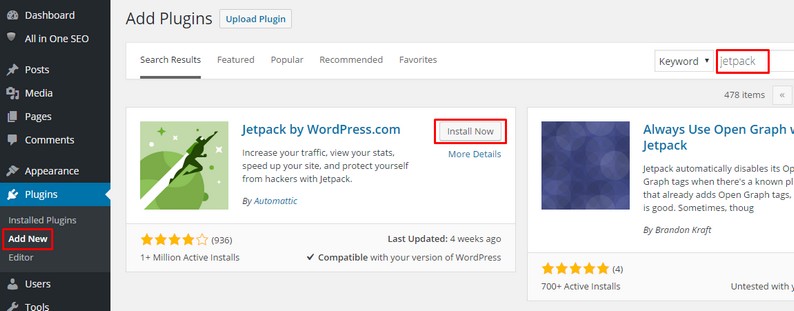
After setting up everything correctly, If you still find anything missing, Don’t worry! JetPack, an all-purpose plugin, stores several configurations of WordPress.com. Install and connect it with your WordPress.com account.
Broken URL’s
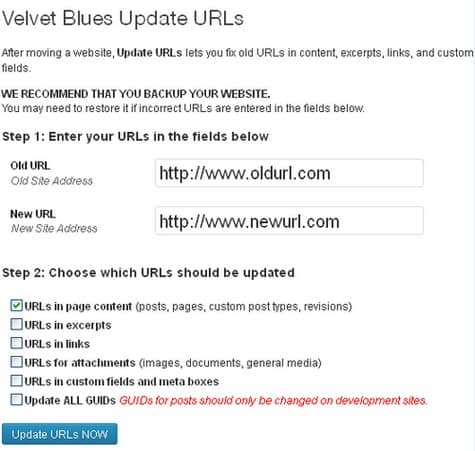
If you find any URL linking to old WordPress, there is an awesome plugin called the Velvet Blues Update URLs that can update your old URLs to new ones.
Conclusion:
WordPress.org gives more freedom and flexibility to a user to make an amazing website as compared to WordPress.com. We’re hoping, you’ve done everything correctly to migrate from WordPress.com to WordPress.org. If you’ve any query or suggestion related to the article, feel free to ask or suggest by using the comment section below.
- Migrate from WordPress.com to WordPress.org - October 27, 2016
Where Should We Send
Your WordPress Deals & Discounts?
Subscribe to Our Newsletter and Get Your First Deal Delivered Instant to Your Email Inbox.


